If you're serious about being a great cook and producing a consistent product, brining is a technique you should not only use, but need to understand in intimate detail. Brining can be a complex subject, which is why this extensive resource page was created.
What is a Brine and How Does it Work?
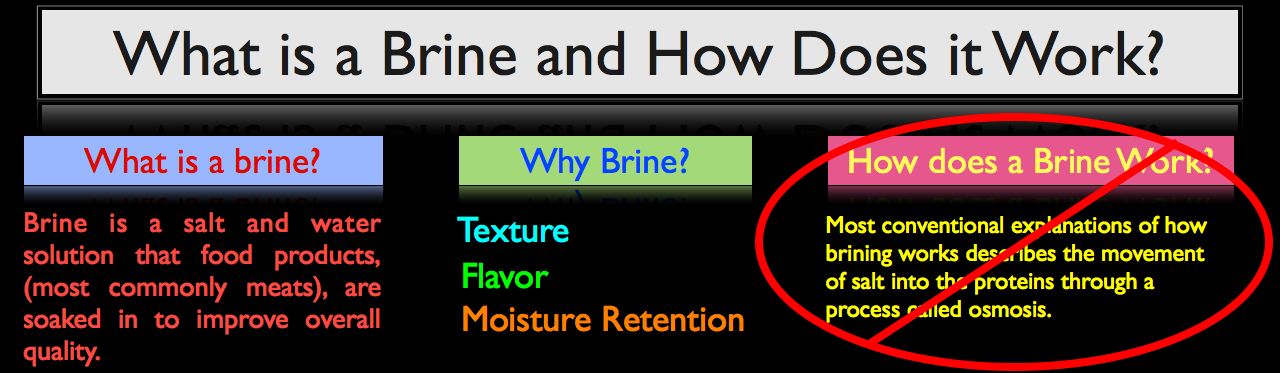
In its simplest form, brine is a salt and water solution that food products, most commonly meats, are soaked in for a given period of time to improve the product’s overall quality. When food is brined correctly, the process yields three major benefits:
- Textural improvement, especially when brining proteins.
- Brines can and will enhance overall flavor. Not only does the salt contained within a brine help to season the food product (assuming the brine is applied correctly), but brines also commonly contain secondary flavor profiles such as herbs, spices and aromatics, that are chosen specifically to enhance the overall flavor of the food product being brined.
- By far the biggest reason food is brined, and that’s moisture retention. Especially when it comes to cooking lean proteins such as chicken breast, pork tenderloin and even fish, brining allows proteins to retain more moisture throughout the cooking process resulting in a moister finished product.
How Does a Brine Work?
The most conventional explanation of how brining works describes the movement of salt and water into proteins through a process called osmosis. This however is incorrect. Brining actually works through diffusion, not osmosis, and it’s important to make that distinction if we are to truly understand how a brine works.
First, lets talk diffusion.
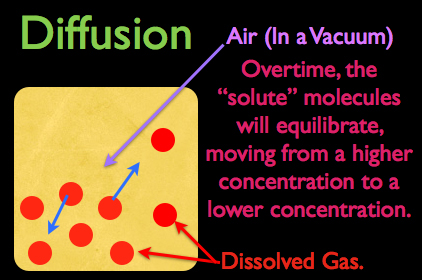 Lets assume that this yellow square in the diagram on the left represents air trapped in a vacuum. Now in this air we have dissolved gas, represented by the red dots, and at as you can see, the gas is more heavily concentrated at the bottom left corner of the square.
As the dissolved gas continues to freely move around in this vacuum of air, let’s think for a second what would happen if a gas molecule started to move towards the bottom left corner of this container. Obviously it would run into some resistance, making the probability of it freely reaching the bottom left corner very unlikely. What’s more, as this molecule comes into contact with its neighbor, it will actually ricochet off and travel in the opposite direction of which it was initially moving.
Conversely, if a dissolved gas molecule tried to move to the top right corner of the container, to an area of lower concentration, it would encounter much less resistance, so the probability of it ending up in the top right corner of this container is statistically pretty good.
This is basically diffusion in action; if given enough time, molecules will move from an area of higher concentration to an area of lower concentration, eventually achieving an equilibrium.
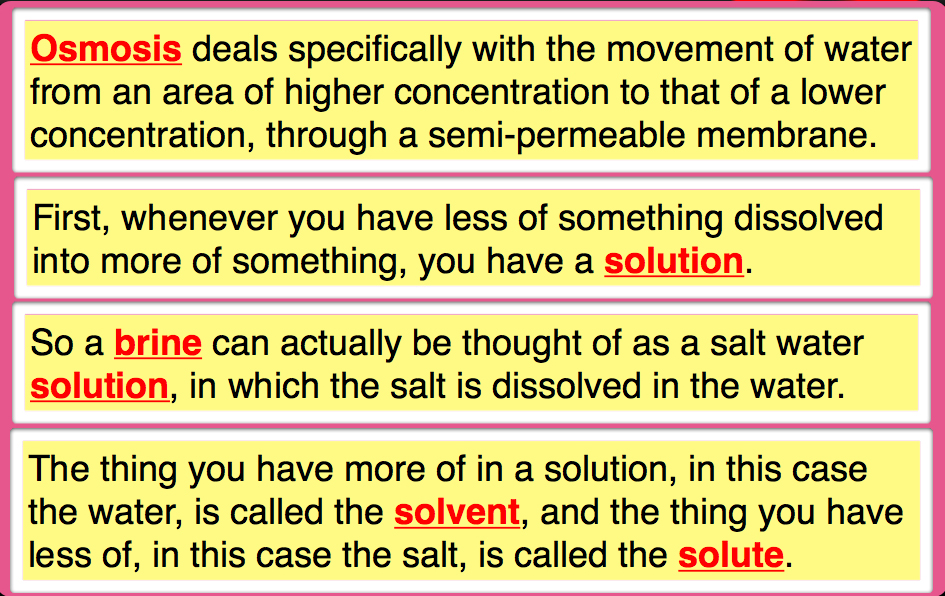
Osmosis on the other hand deals specifically with the movement of water from an area of higher concentration to that of a lower concentration, through a semi-permeable membrane. Now before we move on, let’s go over some quick terminology so you can better understand this process.
First, whenever you have less of something dissolved into more of something, you have a solution. So a brine can actually be thought of as a salt water solution, in which the salt is dissolved in the water. The thing you have more of in a solution, in this case the water, is the called solvent, and the thing you have less of, in this case the salt, is called the solute.
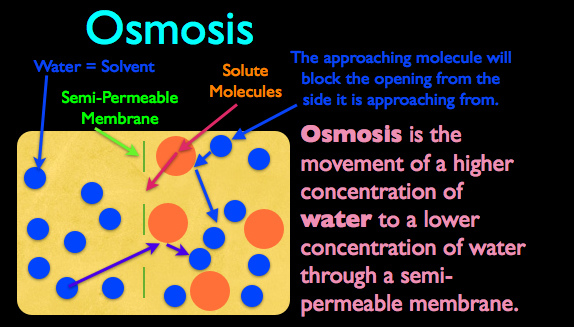 In the diagram to the right is a container of water. Now in this water we a have semi-permeable membrane (meaning some things can pass through the membrane while others can’t) and this membrane separates the water molecules into two distinct areas. On the right hand side of this membrane, we have larger solute molecules that are too large to fit through the openings in the semi-permeable membrane.
For osmosis to occur, there must be a semi-permeable membrane in which the solvent can pass through, (in this case the water) but the solute, can’t. The reason why osmosis works is because when you have billions of molecules randomly bouncing around, some of the solute molecules, (represented by the large, orange dots), will be approaching the membrane opening, while a water molecule is approaching the opening from the same side. Even though the large solute molecule isn’t completely blocking the membrane’s opening, it is still large enough to block certain approach paths. So as a water molecule starts to randomly move towards the membrane’s opening, there’s a good chance it will run into the larger solute molecule and ricochet off, never making it through to the other side.
It’s important to understand that osmosis is based purely on the probability of water’s molecular movement overtime. Because the solute molecules on the right side of the membrane are too large to pass through the membrane’s opening, it is more likely, over time, that more water on the left hand side of the membrane will pass through to the right, then water on the right will pass to the left. This process of water being statistically more likely to move from an area of higher concentration to an area of lower concentration while passing through a semi-permeable membrane is the definition of osmosis.
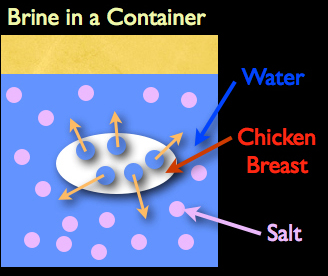 So if osmosis did occur during the brining process, here’s how it would actually work: if you placed a chicken breast into a brine, the salt would be considered the solute. That would mean, if osmosis really were at play, the water contained within the chicken breast would actually have to move outward into the brine.
To further prove that osmosis is not at play during the brining process, lets use some deductive reasoning and work our way backwards. If osmosis actually occurred during the brining process, two things would have to be true:
First, the solute, or the dissolved salt, would have to be too large to penetrate a proteins outer membrane. We know this is false because the interior of brined meat can obviously become salty.
Second, If the salt was actually too big to to pass through the protein’s outer membrane, then the moisture within the object being brined would actually flow outward into the salt water solution, since in osmosis, water will flow through a semi-permeable membrane from an area of higher concentration to an area of lower concentration.
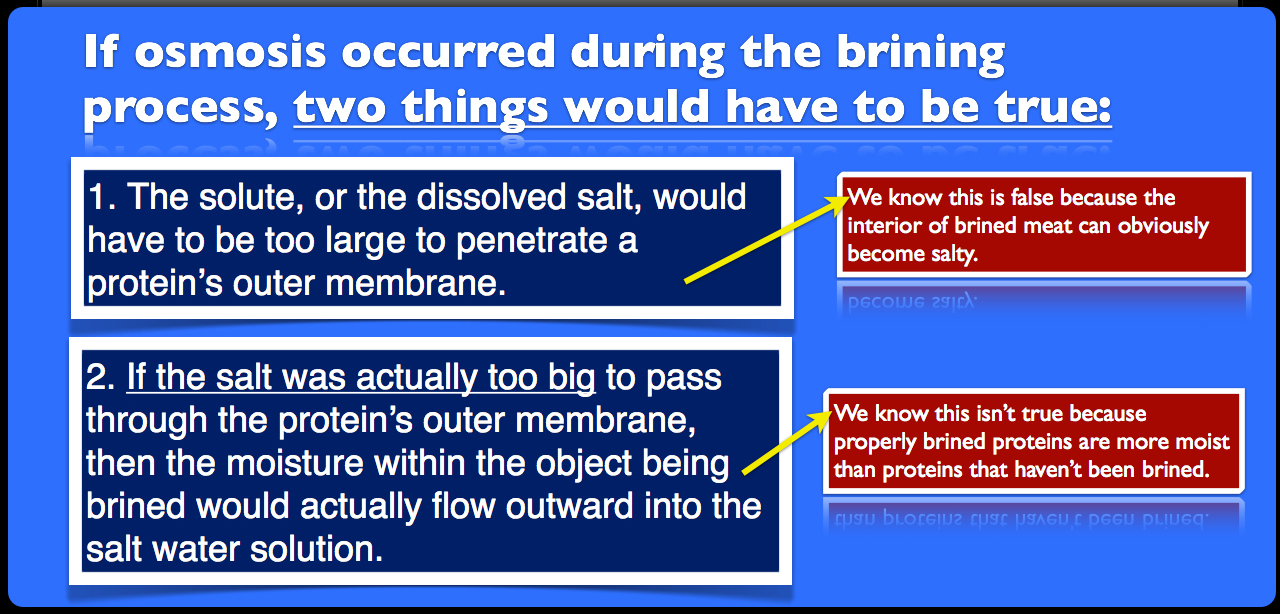
Yet we know through basic observation that both water and salt will enter into a protein during the brining process, we can conclude that brining works through diffusion, not osmosis.
Now the natural question is, “why do we need the salt, besides the seasoning? If water moves into a protein through diffusion, why can’t we just soak a protein in water and have it become juicier?”
And the answer is, technically you can. You can soak a protein in pure water and it will swell, taking on additional water weight, but not as much water as if you add salt to the soaking liquid, and more specifically, proteins also will not bind to water as effectively during the cooking process unless salt is present. Why this actually occurs is extremely interesting, and we’ll be discussing this process in depth, in the following section.
Understanding The Brining Process
To understand how the brining process works, let's start with a pretty standard scenario, and imagine that we're brining a boneless-skinless chicken breast. To create this brine we’re going to simply add salt to some water. The amount of salt that we add isn’t important at this point; we’re going to get into actual measurements and ratios a little latter, but for the sake of this exercise, let's just assume we're adding some salt to a container of water to create a brine.
At this point it’s important to clarify that what we cooks refer to as salt, is known to chemists as sodium chloride, which is just one of many forms of salt contained within a much broader family of chemical compounds. This is important to understand because when salt is dissolved into water, it actually breaks apart into a positively charged sodium ion and a negatively charged chloride ion. The positively charged sodium ion is predominately what effects flavor, adding seasoning to the meat or making the brined meat taste salty if it’s over brined, whereas negatively charged chloride ions are what allow brined proteins to uptake more moisture.
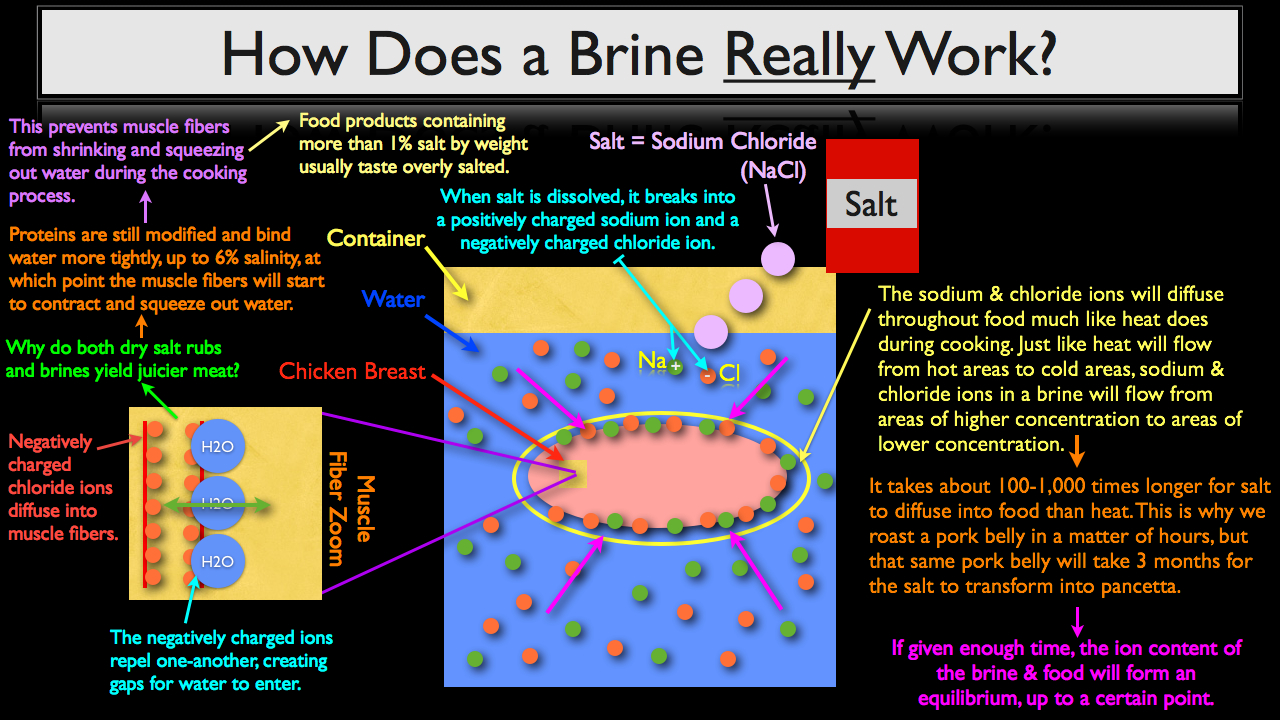
What happens next is the separate sodium and chloride ions will diffuse throughout the food much like heat does during the cooking process. And just like heat will flow from hot areas to cold areas, sodium and chloride ions in a brine will flow from areas of higher concentration to areas of lower concentration.
Now it does take about 100-1,000 times longer for salt to diffuse into food than heat. This is why we can roast a pork belly in a matter of hours, but that same pork belly will take about three months for the salt to transform into pancetta.
If given enough time, the ion content of the brine and food will form an equilibrium, up to a certain point. This means, that there will be an equal amount of sodium and chloride ions inside the chicken breast as there are outside, in the brine. Once sodium and chloride ions start to diffuse into the chicken breast, something interesting occurs.
" Chloride ions, from dissolved salt, diffuse into muscle fibers and accumulate along the surface of protein filaments. As these ions increase in number, they generate a negative charge that loosens and pushes neighboring filaments apart -- analogous to the way magnets with the same polarization repel each other. The charged filaments push far enough apart that they cause the muscle fibers to swell -- if water is available to fill the space opened up in the process."
Modernist Cuisine, Volume 3, Page 154
Remember in our previous section we made the assertion that soaking meat in plain water will increase it’s water weight through diffusion but the meat will not absorb as much water compared to when salt is present? This is true because the negatively charged chloride ions create larger than normal gaps between protein fibers by first diffusing onto their surface and then repelling one another. This in turn allows extra space for additional water to diffuse into the protein being brined.
Now the naturally intuitive question arises; why do both dry salt rubs and brines yield juicier meats? In fact, there is a blatantly false culinary dogma that states salting meat before cooking will draw out excess moisture, yielding a dry, finished product.
This however is not only false, but the exact opposite of what happens when a protein is salted.
"...even if there is no surrounding water to draw in, proteins are modified by the ions in ways that cause them to bind the water in the flesh more tightly -- as well as to resist the shrinking of muscle fibers that squeezes juices out during cooking. The flesh continues to swell and bind water more tightly until its salinity increases to 6%, and then it shrinks and begins to lose water." Modernist Cuisine, Volume 3, Page 154
So at less then 6% salinity, salting meats actually prevents the muscle fibers from shrinking and squeezing out water during the cooking process. Now just to put this into perspective, the average threshold at which food begins to taste overly salted is usually above 1% by weight. So even though a protein containing 5-6% salt by weight will retain moisture while being cooked, it doesn’t necessarily mean that you want your overall salt content to be that high.
The Three Major Brining Strategies
Now that you understand how the brining process works, we can begin to discuss various approaches. Based on what you've just learned, there are three major strategies that can be used to apply salt to proteins in an effort to enhance their flavor, texture and ability to maintain moisture.
Dry Rub "Brining"
The first approach is Dry Rub “Brining." Notice that I put the word "brining" in quotes because I am using it rather loosely. Yet as we discussed in our previous section, the addition of salt alone will allow proteins to bind more readily to water during the cooking process, so in the simplified sense that brines improve texture, flavor and moisture retention, a salt heavy dry rub can be thought of as a “dry brine.”
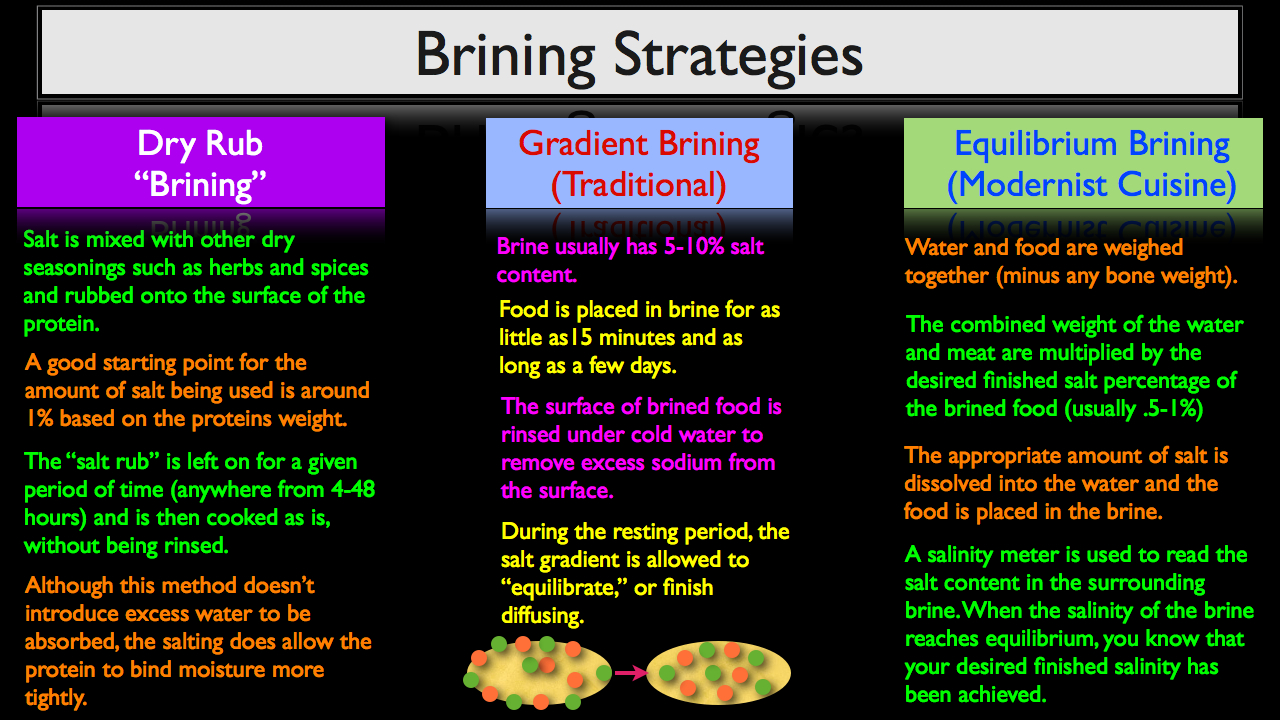
When making a dry brine, salt is usually mixed with other dry seasonings such as herbs and spices and rubbed onto the surface of the protein. A good starting point for the amount of salt to use is around 1% based on the protein’s weight.
The salt rub is left on for a given period of time, (anywhere from 4-48 hours), and then cooked as is, usually without being rinsed. Although this method doesn’t introduce excess water to be absorbed, the salting does allow the protein to bind moisture more tightly, yielding a moister finished product, assuming of course that the protein is cooked properly.
Gradient Brining (Traditional Approach)
Next, lets take a look at the traditional gradient method, which gets its name from the fact that a salt gradient is being used to brine the food, meaning the brine contains a much higher salt content than what you would want your finished food product to contain. When using this approach, a gradient brine will typically contain about 5-10% salt, based on the water’s weight. The food is then placed in the brine for as a little as 15 minutes and as long as a few days.
But just because you roast a piece of beef in a 500ºF/260ºC degree oven doesn’t mean that’s your desired finished temperature. Chances are you’ll be serving the beef at a much lower internal temperature or 135-160ºF/57-71ºC. Just like you’re using a temperature gradient to transfer heat to food when cooking in a high temp oven, with the gradient brining method, the same holds true with the salt content. This is why when the food product is removed from the brine, it is immediately rinsed or soaked in cold water to remove excess sodium from the surface.
This rinsing step is then followed by a resting period which allows the salt gradient to form an equilibrium as the sodium and chloride ions finish diffusion. When you pull a protein from a gradient style brine, the sodium and chloride ions will be diffused unevenly throughout the protein, with a higher concentration towards the exterior of the meat.
When the meat is rinsed and allowed to rest for a given period of time (usually a few hours to overnight), the remaining sodium and chloride ions will finish diffusing and more or less equilibrate. Interesting enough, this is the same reason why meat is rested after cooking, but again, because salt diffusion takes about 100-1,000 times longer than heat diffusion, you usually only need to rest meat for 5-30 minutes, where as a brined protein will need to rest anywhere from 2-24 hours, after being removed from the brine.
Equilibrium Brining (Modernist Cuisine)
Just like cooking in a high temp oven requires timing and intuition, gradient brining is to high heat cooking as equilibrium is to the control and precision of sous vide. And just like cooking sous vide, the equilibrium method does take longer, but is also much more accurate, taking the cook's "intuition" out of the equation. The amount of salt dissolved in the brine is only enough for the interior of the protein to reach the precise amount of salt desired, making it impossible to over brine.
Creating an Equilibrium Brine
- Weigh water and food together, subtracting any bone weight, since salt will not diffuse into bones.
- Multiply the combined weight of the water and meat by the desired finished salinty you want your protein to contain at the end of the brining process (usually .5-1% by weight).
- Dissolve the appropriate amount of salt into the water and place food in the brine.
- Use a salinity meter to take readings throughout the brining process. When the brine’s salinity drops to the desired finished salt percentage, you can conclude that your brine and food have reached a state of equilibrium and the bringing process is complete.
Now this may seem a little confusing at first, but in the following section, we’re going to explore in detail how to calculate both a traditional and equilibrium brine, which will help you better understand this process.
How to Calculate a Brine
One of the most common questions I receive about brining is "how much salt should I add to the water." As we discussed in our previous section, it really does depend on the style of the brine that you're using (dry, gradient or equilibrium), and at least for the first two approaches, little bit on personal preference as well. Understanding how to calculate the proper amount of salt will not only allow you to scale your brining recipes up and down with ease, but will also help you better understand how different salt concentrations will affect your end product.
How to Calculate a Gradient Brine
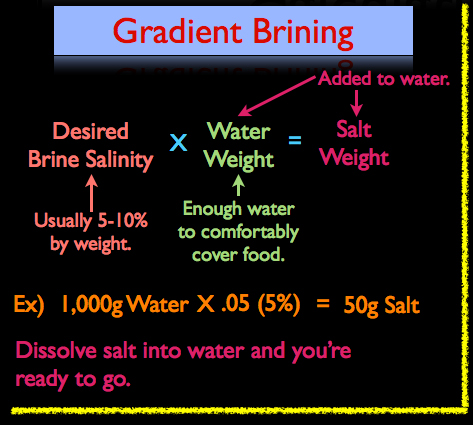 When calculating a gradient style brine, use the following formula:
Desired Brine Salinity (Salt %) X Water Weight = Salt Weight
The "Salt Weight" is then dissolved into the water and the brine is ready to use. As mentioned in our previous section, the salinity of a gradient brine is usually 5-10% salt, based on the water’s weight, and the amount of water used is typically just enough to completely submerge the product being brined.
For example, lets say we’re brining a couple of chicken breasts and we’ve determined that it’s going to take roughly 1,000g of water to comfortably cover the breasts. I want to make a 5% brine, not because it’s better than say an 8% brine, but because it’s what I’m used to using. So our formula would look like this:
1,000g Water X .05 (5%) = 50g of Salt
The 50 grams of salt is then dissolved into our 1000g grams of water, yielding a 5% brine.
By the way, when using the gradient brining method, it’s easier to always use the same strength brine and then adjust your brining times for each individual product. At Stella, we make a large batch 5% brine and use this to brine everything from chicken to pork to fish. Instead of making individual brines for each different type of protein, we’ll consistently use our 5% brine and adjust our brining times based upon the actual product that we’re brining.
How to Calculate an Equalibrium Brine
Calculating an equilibrium brine is a little more involved but just as easy with a little practice. To start, you must first take the weight of the food being brined and subtract any bone weight, since the brine will not diffuse into the bones.
Next, take the food weight (minus any bone weight) and add it to the amount of water being used. It is highly recommend that you use equal amounts of water to meat by weight, because as you’ll see in a few moments, it makes calculating an equilibrium brine much easier.
Once you’ve added the water weight to the weight of the food, simply multiply that amount by your desired finished salinity; this means that if you want your brined food product to contain one percent salt when the brining process is complete, you would multiply the combined weight of the water and food by .01 (or 1%). This equation then results in the amount of salt you need to create your equilibrium brine.
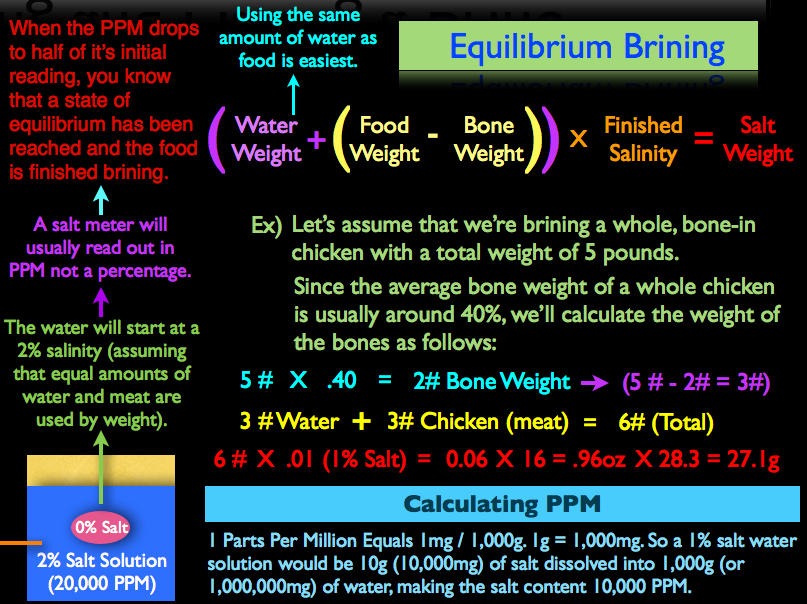
For example, let’s assume that we’re brining a whole, bone-in chicken with a total weight of five pounds. Since the average bone weight of a whole chicken is usually around 40%, we’ll calculate the weight of the bones as follows:
5lbs X .4 (40%) = 2lbs of Bone. Our actual flesh weight is then obviously three pounds.
Since it’s easiest to use the same amount of water when calculating an equilibrium brine, we’re going to take three pounds of water and add it to three pounds of chicken meat for a total of six pounds. Next, I’m going to decide that I want my protein to contain 1% salt when the brining process is finished (remember, you’re salt range will be half a percent on the low side to one percent on the high side). So to achieve a one percent salt content in my finished product, I’m going to multiply the combined weight of the chicken meat and water (six pounds total) by .01 (or 1%) to get .06 pounds.
As mentioned in the previous section when we outlined equilibrium brining, the salt is dissolved into the water and readings with a salt meter are taken until the brine’s salinity the desired, finished percentage. So when the salt is initially dissolved into the water, the water will contains two percent salt because it has not had any time to diffuse into the chicken flesh. Now the trick however is that salinity meters usually don’t give readings in percentages, but instead, parts per million.
This means, that if you’re using a salinity meter, it is helpful to understand how to calculate parts per million, or PPM for short.
How to Calculate Salt's Parts Per Million in a Brine
1ppm = 1 milligram per 1,000g. To put this into perspective, 1 gram is equal to 1,000 milligrams. This means, a 1% salt water solution would be 10g (10,000mg) of salt dissolved into 1,000g (or one million milligrams of water), making the 1% percent concentration read out as 10,000 parts per million on a salinity meter.
This is why using equal amounts of water and food makes this process so much easier; when the parts per million drops to half of it’s initial reading, you know that a state of equilibrium has been reached and the food is finished brining.
So when our equilibrium brine, which in our example had an initial reading of 2% or 20,000ppm, drops to 1%, or 10,000ppm, we now know that the chicken is also at 1% salinity, because an equilibrium has been reached, and the brining process is complete. Also, a little tip that I didn't think to put in the video but was brought to my attention by one of our community members over on YouTube is that a PPM reading is still just a base 10 unit of measurement. So a neat little shortcut is to just ignore the four zeroes at the end of the PPM read out, which will leave you with just the salt percentage.
Secondary Ingredients for Brines and Speeding Up The Brining Process
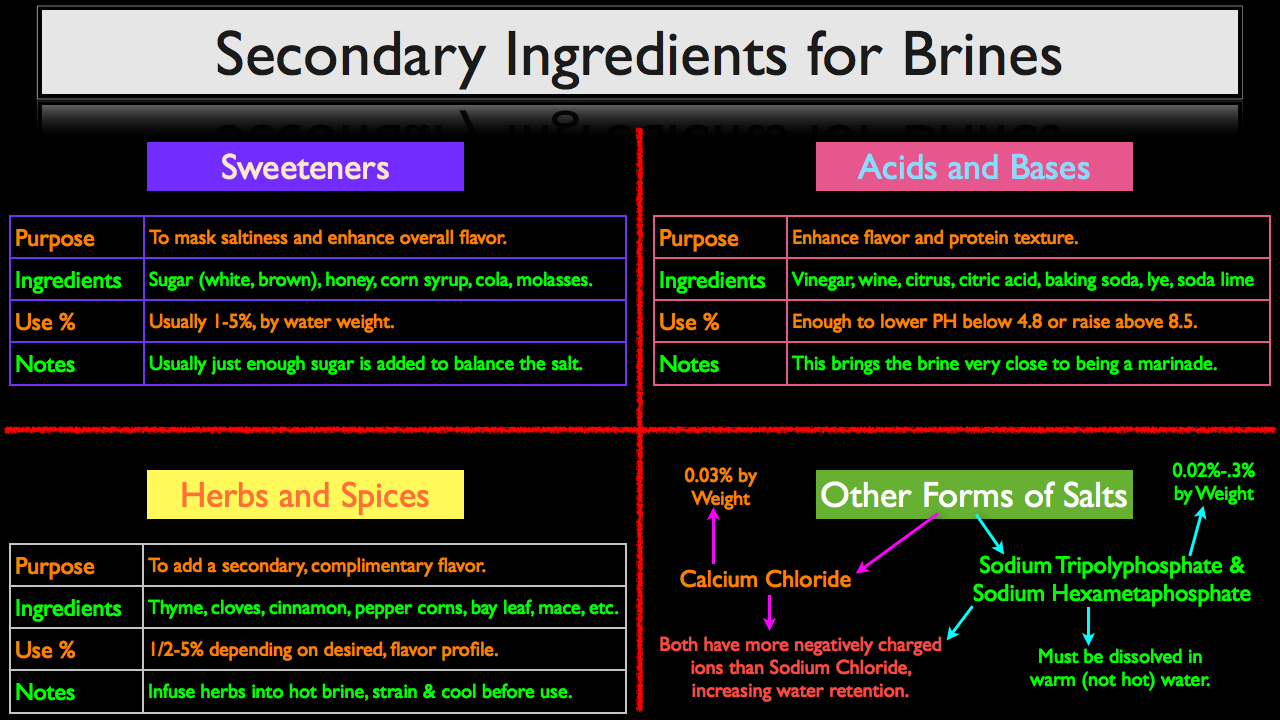
Once a brine is constructed, whether you’re using the gradient or equilibrium method, any number of secondary ingredients can be added to improve the brine’s overall effect on flavor, texture and even moisture retention. These secondary ingredients are best understood when broken into their four individual categories; sweeteners, acids and bases, herbs and spices, other forms of salt.
The purpose of adding sweetness to a brine is to mask or balance the saltines while enhancing the brine’s overall flavor. Although anything that adds sweetness to a brine can be used, the most common ingredients are sugar (both white and brown), honey, corn syrup, cola and molasses. These sweeteners are usually added in a concentration of 1-5%, based upon the water’s weight. It is important to note that commonly, just enough sugar is added to balance the salt, but not enough to leave a perceptible sweetness when the brined product is consumed.
The purpose of using acids and bases in a give brine is to both enhance overall flavor and to change the protein’s texture. Common ingredients used for this purpose are vinegar, wine, citrus juice, citric acid, baking soda, lye and soda lime. Instead of a precise use percentage, enough acidic or base ingredients can added to a brine to drop the PH of the solution below 4.8, or raise it above 8.5. The acidic or base environments will break down some connective tissue and start unravel the protein strands, making the finished product more tender. When enough acid or base is added to a brine so that it effects a protein’s texture it is almost indistinguishable from a marinade. In fact, the more you dive into brines and marinades, the difference is usually based more on intent than ingredients. This is something that we will discuss in more depth at a later date.
Herbs and spices on the other hand are used specifically to add a secondary, complimentary flavor. This could really be any number of ingredients, but some common examples include thyme, cloves, cinnamon, pepper corns, bay leaf, mace, etc. You can also use aromatics such as onions, carrots, celery, peppers, etc.
Depending on the desired flavor profile and the pungency of the herb and spice, the use rate can range from half a percent to five percent by weight. For example, if using a really pungent herb like fresh rosemarry, using more than half a percent by weight can could cause the rosemarry flavor to become over bearing. However, the use percent given here should be used as a starting point, not an unbreakable law. Ultimately, you will have to base your use percentage on your personal preference and a little trial and error.
When using herbs and spices in a brine, the best way to incorporate their flavor is to first bring the water to a simmer, and then simmer or steep the herbs and spices like you’re making a tea or stock. Once the flavor is to you’re liking, pass the water through a strainer, add your salt and chill to below room temperature before using.
The infusing and straining step accomplishes two things:
- Since all herbs and produce can potentially have bacteria on their surface, placing them in simmering water, even for a few seconds, will essentially pasteurize them. If not pasteurized, the small amounts of bacteria could potentially turn your brine bad. This however is unlikely to occur when using a a traditional gradient brine since the salt content is high enough to kill most bacteria.
- The surface of meat works much like a very fine filter or sieve. This means that only the flavor compounds dissolved in the water will actually be able to penetrate the proteins surface and effect its flavor. Using heat to infuse flavors into your brine first and then straining out the ingredients will ensure a more consistent result since some flavors will continue to diffuse into your brine over time.
The final category of secondary ingredients is other forms of salt. While most brine recipes call for sodium chloride (common table salt), other salts with more negatively charged ions can be used to aid in moisture retention while minimizing the familiar salty flavor of sodium chloride.
The most notable salts that can be used to enhance a brine are calcium chloride as well as two types of phosphate salts, Sodium Tripolyphosphate and Sodium Hexametaphosphate. Both phosphate salts and Calcium Chloride have more negatively charged ions then sodium chloride, which will increase water retention.
Anyone who has ever used calcium chloride in ionic spherification, (a modern technique used to make faux caviar), knows that it can have a bitter taste. However, when calcium chloride is added to a brine in small concentrations, (usually at or below 0.03% by weight), its bitter flavor is imperceptible, but it will still add enough negatively charged ions to the brine to positively effect moisture retention.
Sodium Tripolyphosphate and Sodium Hexametaphosphate are usually used in concentrations as low as .02% to .3% by weight. These salts don’t dissolve as easily as other forms of salts, so they must first be dissolved in a small amount of warm (not hot) water before they are added to your brine formula.
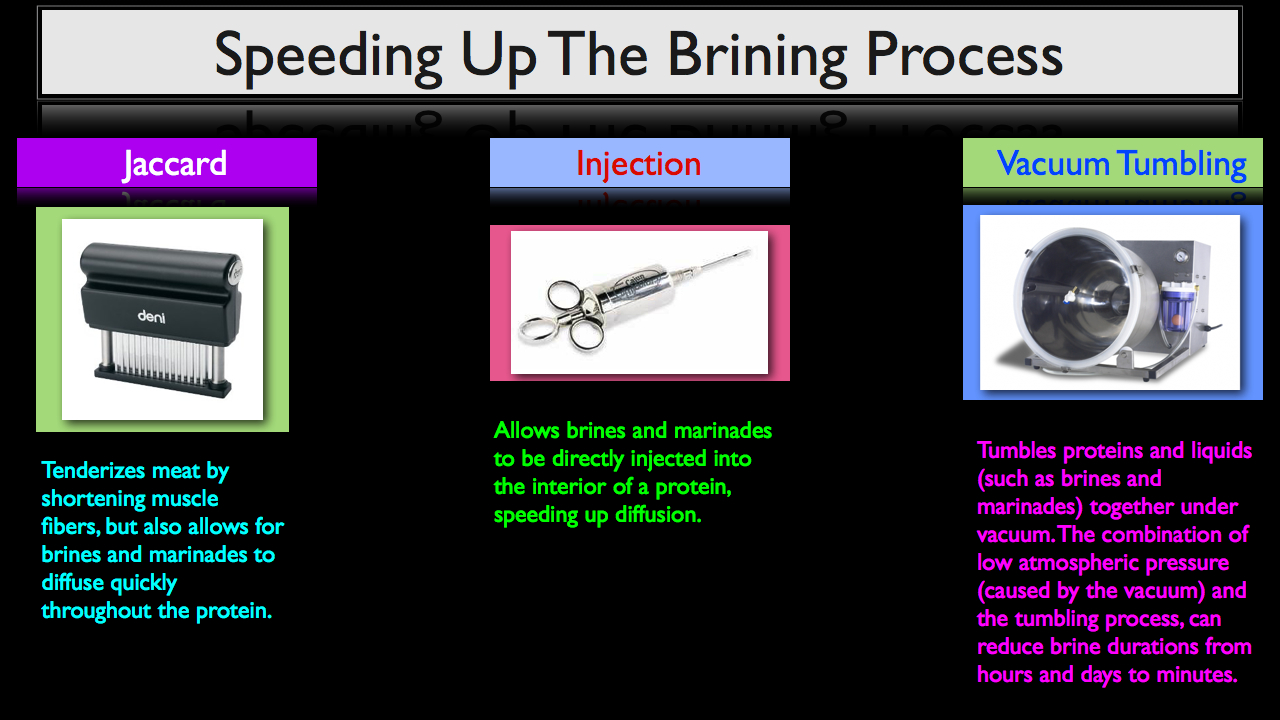
Three Methods for Speeding Up The Brining Process
Once your brine is formulated, it does take time for your salt and other ingredients to diffuse into the product. There is, however, a few different methods you can use to speed up the brining process.
- Jaccard (also commonly referred to as a needler), which tenderizes meat by shortening the muscles fibers, but also allows for brines and marinades to diffuse quickly throughout the protein.
- A simple brine or marinade injector, which allows liquids to be injected directly into the interior of the flesh, speeding up diffusion.
- A vacuum tumbler which, like its name suggests, tumbles proteins and liquids together under vacuum. The combination of low atmospheric pressure (caused by the vacuum) and the tumbling process can reduce brining durations from hours and days to mere minutes.
Now before we wrap this up, I want to bring your attention to the 5% Brine Chart below. This chart assumes the use of a 5% brine, and please note that the times given here are approximations. Since I use almost exclusively a 5% brine in most of my recipes and videos, you can refer to the specific recipe for more information on brine duration and its accompanying procedures. But this chart will give you some good ball park figures when it comes time for you to play around with creating your own brines.
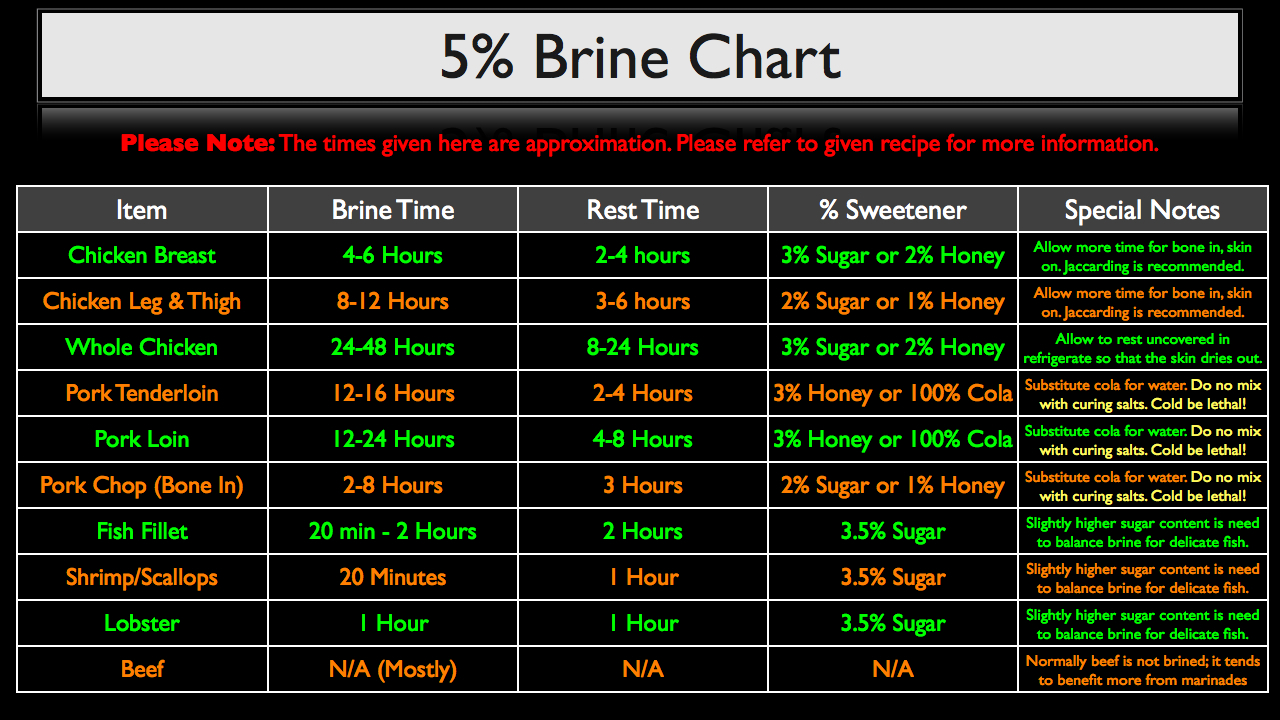
Brine time is how long the protein should sit in the brine for. The rest time is how long the item should be allowed to rest out of the brine after being rinsed. For example, when brining a chicken breast in a 5% brine, I recommend that you brine for 4-6 hours, remove the breast from the brine, rinse, and let rest for 2-4 hours in your refrigerator before cooking.
Also, when brining the pork loin or pork chop, you can substitute 100% of the water with cola, which is pretty classic approach to brining pork. However, it’s very important to note that you SHOULD NEVER MIX CURING SALT (sodium nitrate or nitrite) with cola, because it will form a potentially lethal compound. So use regular table salt only.
Other than that, this chart is meant to be a jumping off point for you to create your own brine recipes. But please, as always, use your best judgment and feel free to tweak as necessary.
One helpful guideline to keep in mind is that the time required for brining a given protein scales approximately with the square of the protein’s thickness. So a piece of meat that is twice as thick will take roughly four times longer to brine.
Related Resources
There are 89 Comments

Hi Tony, I disagree with
Hi Tony,
I disagree with the brining page on Wikipedia. If you check out the "Talk" tab, you'll see that there are multiple people who claim that the entry is incorrect. The moderator of the brining page counters with "The claim that brining does not add water to the cell via osmosis goes against every single food science text book I have."
Unlike the moderator of the Wikipedia page, I don't believe that food science books are infallible.
I'll be releasing part two of the brining video soon which will clear up some of these issues.
Yes, brining your chicken
Yes, brining your chicken breast (or chicken in general) will absolutely help these issues. In the next video we're going to discuss the difference between gradient brining and equilibrium brining, and I'm also going to publish a time chart that you can use as a guideline for brining times.
Hi Nicolas, I brine large
Hi Nicolas,
I brine large quantities of chicken breast all the time and I still use a 5% brine. Just make sure that you use plenty of extra liquid and try not to pack the proteins too tightly. A five gallon cambro filled with 30 chicken breasts and the rest water is more than sufficient to effectively brine the breast. A good rule of thumb is if you're covering the protein by at least two inches of brine, you shouldn't have any issues.
Let me know if you have any more questions and welcome to Stella Culinary.
Brining can be used with
-
Brining can be used with moist heat methods but the reason why you commonly see brining only used with dry heat methods is because the protein is being cooked under mid well. No matter how much extra moisture is taken in during the brining process, once the protein's internal temperature reaches around 155-160F, the protein fibers will start to contract, squeezing out all the moisture, negating the effects of brining. Since most moist cooking techniques tend to cook the meat well done, (think braised beef short ribs), brining is usually not used. But with modern techniques like sous vide, or in preparations where the protein will not be cook above an internal of 155F, brining does serve a purpose.
-
If given enough time, any salt on the surface of a protein will equilibrate through diffusion. If, however, you placed a piece of tuna in a brine for 20 minutes, removed it and ate immediately, most of the salt will have remained on the surface of the fish. What it really comes down to is how thick the protein is. The thicker it is, the longer it will take the salt to completely diffuse throughout the meat.
Turkey
Do u have a good brine recipe for turkey.Love ur videos
@ Jebbia, Using enough
@ Jebbia,
Using enough water to completely cover your turkey, make brine with 5% salt and 3% sugar. Bring the brine to a simmer and add 3-5% fresh thyme sprigs, 1% black peppercorns and 5% lemon juice (you can add a little zest as well). Cover with lid and turn off heat. Allow ingredients to steep for 20 minutes, strain and then cool.
For a whole turkey, brine for two days. For individual parts (breast or legs), brine for 12-24 hours.
Here's the recipe breakdown:
- 100% Water
- 5% Salt
- 3% Sugar
- 3-5% Fresh Thyme (depending on personal preference).
- 5% Lemon Juice
Resting Turkey
I've never done a turkey with the equilibrium method, but I think you're correct in assuming that it would take the better part of a week. If brining individual turkey parts, I would recommend a 12 hour rest. If brining a whole turkey, obviously it would depend on the turkey's size, but for a 12 pounder, I would say at least a 24 hour rest.
Sounds like you have a good
Sounds like you have a good plan of attack! Good luck.
Buttermilk brine
I've have seen on culinary shows were buttermilk is used as a brine. Maybe brine is not the correct word to use for this process. It is claimed to be better than brining. Can you comment on this process?
Buttermilk by itself is
Buttermilk by itself is acting as a marinade, not a brine. Because buttermilk is acidic, it will partially denature the proteins of whatever meat is placed in it, making it much more tender. The partial denaturation of the proteins caused by the buttermilk will also allow the protein to bind to more moisture, but not as much as if salt was present.
You can, however, turn the buttermilk into a brine (which makes the best fried chicken ever) using it instead of water in your brine formulation.
Buttermilk brine
Thanks for the comment Jacob. I will give that a try. I believe I will sous vide that chicken.
Brining Works Great For Game Meats
Yes, brining works great for game meats because like you said, they are usually very lean. Also, since game meats sometimes have a strong flavor, brines are a good tool to subdue those flavors by introducing complimentary herbs and spices.
Also, just because beef generally isn't brined, it doesn't mean that it's a culinary no-no. But if you spend the money on an expensive, prime cut of beef, you'll probably want to cook and eat it 'al natural.'
Re: Equilibrium Brining
Yes, you could do that, and it would take some trial and error, but eventually you'd find a time that worked well for you. With that said, I still mainly use gradient brining just because that's what I'm comfortable with and my results are consistently good.
Injection brining is a great
Injection brining is a great way to speed up brining, especially with pieces of protein that are covered with fat or skin which water can't easily penetrate. Some cuts that immediately come to mind are whole poultry (duck, chicken, turkey), brisket and pork shoulder.
4-6 hours is the minimum, 24
4-6 hours is the minimum, 24 hours is about the longest you want to go. What you can do though is rinse well and soak in water for about 1 hour. That should do the trick.
Thanks for the Comprehesive Info.
Hello Chef -
Just wanted to say thanks for doing all of this work to provide such a detailed reference on brining. It will help me immeasurably.
Question on Ways to Reduce Heavy Salt Flavor
Hi Chef,
I did a 5% brine for 2 large chicken breasts, brining for 8 hours, rinsed, then rested for 3 hours. The result was super moist, but with a very heavy salt flavor. I did cover with brine 3" above the breasts. Is this just my palate's ability to taste salt? Should I cut back on my solute percentage? Or, is there something else I can do? I did not let it rest in water only, after rinsing. Maybe that will help?
Thanks.
Hi Marco, A couple of
Hi Marco,
A couple of things.
- Try adding about 3% sugar and/or lemon juice. This will help to balance the saltiness.
- You can try shortening the brine time slightly and see if the chicken breast remains moist while being less salty.
- Soak the chicken breast in fresh water after the brine. Try a 2-4 hour soak, switching out the water every 1-2 hours. This is actually the method that Chef Heston Blumenthal recommends. He uses an 8% brine overnight when doing a whole chicken, but then soaks it in cool water for a number of hours, switching out the water every couple of hours.
Chef, Thank You...
for providing the additional options. I will be brining some more breasts next week so I think I'll shorten the brine time to 4-6 hours and try the post-brine soaking technique.
A Couple More Questions...
Hi Chef Burton -
As I'm getting in to brining more, I've found a lot of contradictions, misinformation and just bad information out there on brining from many known and self-proclaimed culinary experts. After a fair amount of reading, I trust your science-based explanation, combined with your experience. No arse kissing here, but it's why I'm asking a few more follow up questions, whenever you find a moment.
-Does reducing the brine salinity below 5% still make for an effective brine? I'm guessing probably not, though I'm not really sure why.
-Some folks out there claim that brining results in the same "evil" as salt and water laden processed meats? I know that's not completely true if you are starting with clean, organic meat, but is there any value to this statement, in your opinion?
Thanks much.
-Does reducing the brine
-Does reducing the brine salinity below 5% still make for an effective brine? I'm guessing probably not, though I'm not really sure why.
Yes, you can still have an effect brine with less than 5% salinity, but it will take longer. This is why gradient brining works, which we discuss in video three of this series.
-Some folks out there claim that brining results in the same "evil" as salt and water laden processed meats? I know that's not completely true if you are starting with clean, organic meat, but is there any value to this statement, in your opinion?
Unfortunately there are lot of uniformed people out there who think just because they cook a few nights a week, they are an expert on all subjects of cooking. Salt and water is used in almost every cooking application. In fact, a very simplistic view of cooking is controlling water through the application of heat.
Do these same people salt their pasta water? Will they poach fish and then season with salt? Do they marinade their steaks? Since when did salt and water become so "evil?"
So my opinion on anyone who calls brining "evil" is that they're horribly misinformed and ignorant on the subject of cooking.
Thanks for clarifying...
Yup, I've watched your brining videos and I've downloaded the content. I didn't see any guideline on brining below 5% salinity, but I think what you're saying is the science behind it works at a lower salinity as well, with a longer brine time.
Personally, I am not trained as a chef, I'm no expert, just an avid cook who loves food. I know my cookery weaknesses, which are many. Ergo, my sometimes naive questions.
There's really no such thing
There's really no such thing as a "naive" question in cooking. None of us were born with knowledge and we all started from the same level of understanding. Glad you're finding Stella Culinary helpful. Let me know if you have any more questions.
Chef, Appreciate the Encouragement...
and the free resources.
My Modified Brine Worked Better
Hi Chef,
Just an FYI - This time I did a 4% brine w/ 3% sweetener (honey) and brined for 5 hours, then rested for 2 hours. The meat was skinless, boneless breasts. I didn't apply Chef Heston Blumenthal's soak method this time because I wanted to see what results I'd get without going that extra step.
For my palette, much better. Still a saltiness, but at a level I enjoy and still very moist.
Thanks for the tips.
Thanks for the update. Glad
Thanks for the update. Glad it worked out for you.
Yes, brining will still add
Yes, brining will still add moisture and flavor to the duck, but it isn't as necessary since duck is usually cooked to mid-rare or medium. It's only when you cook meats past medium that a brine is absolutely necessary, or when a cut of meat is really lean, such as pork tenderloin, chicken breast, etc.
Although whole roasting a
Although whole roasting a duck is festive, you're much better off breaking down the duck, pan roasting the breast, and confiting the legs.
Hey Rob, Even though you'll
Hey Rob,
Even though you'll have the head in a brine, you still need to keep it at refrigeration temperature. You can accomplish this with an ice chest and ice packs, but make sure you're monitoring the temperature and refreshing the ice packs as needed.
For the head cheese we make at Stella, our brine recipe is 5% salt, 3% sugar and .2% sodium nitrite. So for a 1000g batch of brine, the recipe would look like this:
- 1000g Water
- 50g Salt
- 30g Sugar
- 2g Sodium nitrite
Let me know how it turns out, or if you have any other questions.
Hey Ron, Thanks for the
Hey Ron,
Thanks for the heads up on the broken image link. I just fixed it. You can download the chart by right clicking and choosing "save as."
Welcome to Stella Culinary. Let me know if you have any more questions.
Hi Ron, I would add the
Hi Ron,
I would add the thyme and peppercorns by sight, but weigh as you go. That way, if you want to add more or less next time, you can. Once you have the weights of what you added, you can convert that into a percentage, and then scale that up or down accordingly.
The lemon juice is there to act as a flavoring and drop the PH to help tenderize the meat. 5% is a good base line, but again, you can adjust this down based upon preference.
The nice thing about keeping track of all the percentages, is you'll quickly be able to discern what works best for you over the span of a couple batches of brine. Once you get your base recipe down, you'll be able to reproduce it again and again, yielding a consistent product.
Let me know if you have any more questions.
@ mikee, Yes, unless using
@ mikee,
- Yes, unless using an equilibrium brine which doesn't require resting.
- Yes, you can still add more aromatics during the cooking process. You'll have to do some fine tuning to get it just how you want, but unless you're using a really strong flavor like rosemary in your brine, you can almost always reinforce with more aromatics during cooking.