Error message

  • Deprecated function: implode(): Passing glue string after array is deprecated. Swap the parameters in drupal_get_feeds() (line 394 of /home2/cheffrog/public_html/newsc/includes/common.inc).
  • Deprecated function: The each() function is deprecated. This message will be suppressed on further calls in menu_set_active_trail() (line 2394 of /home2/cheffrog/public_html/newsc/includes/menu.inc).

Blogs

How To Cook Risotto

Risotto is made with Italian-grown Arborio rice. Arborio has rice kernels that are shorter and fatter than other short-grained rice. The kernels contain a high amount of starch, which is what gives risotto its creamy texture. A common misconception is that cream is added to risotto to give it its creamy texture. Classic risotto, in fact, does not contain any cream. Although adding cream is not the worst of culinary sins, it should be added for richness and flavor, not texture. More on this later...

Risotto Technique

  • Start by sweating shallots in a pan with butter and a little salt, until the shallots are soft and tender. For every 1lb of Arborio rice, you will need to use 2-4oz of butter and sweat about 5 shallots.

  • Add the Arborio rice to the pan, stirring with a wooden spoon until the rice kernels are evenly coated with the butter; Do not brown.

  • Note: You don’t have to use butter for your fat. Any fat will do such as pork, duck, or olive oil - butter is just the classical choice. Take into consideration the flavor profile the fat you choose will impart on the finished risotto. As far as most chefs are concerned, butter is KING!

  • Once the rice is sautéed and coated evenly, add hot stock or water that is simmering in a separate pot, one ladle at a time.

  • Note: For every cup of Arborio rice, you will need at least 3 cups of hot stock or other liquid

  • Very gently simmer rice while constantly stirring.

  • Once the rice absorbs the first ladle of liquid, add more, one ladle at a time, stirring constantly. Repeat until the Arborio rice is soft but still “al dente”, and the starches have released from the kernel making the risotto nice and creamy.

  • Finish by stirring in butter and freshly grated parmesan.

If at all possible, use the correct corresponding stock of the protein you will be serving with the risotto. For example, if you will be serving it with fish, use a fish stock; if you will be serving your risotto with beef, use veal stock, etc. If the risotto is served as the entrée itself, use whatever liquid you feel is appropriate for your desired finished dish.

To Cream or Not To Cream

The debate among chefs on whether or not to finish their risotto with cream is a passionate one. Traditionally speaking, risotto is not finished with cream; instead, the creaminess is lovingly coaxed out of the starchy kernels of the Arborio rice. Here are some things you need to consider when making the decision “To Cream or Not To Cream.”

  • If you add cream for a creamy texture, I apologize, but you are sorely misguided. The creamy texture of your risotto should come from the Arborio rice itself. Remember, you are making risotto, not rice with alfredo sauce.

  • If you add cream for extra body and fat content (fat is always welcomed by the human palate), then you are adding it for the right reason.

  • Take into consideration that when you add fat to anything, it coats the palate, muting other flavors. The more subtle flavors of your risotto will be less detectable, so consider adding more salt or any other predominant seasoning or flavor you want to manifest in your risotto.

  • If you are serving the risotto with a more delicate protein, such as fish or poached poultry, I would leave the cream out. It may make the risotto too heavy, and as good as the risotto is by itself, your starch should never overpower your protein, it should always add to it.

  • When adding cream to a risotto, some chefs will whip it into a stiff whipped cream and then fold it in. This will not only give the risotto a rich flavor, but also a light and creamy texture.

Restaurant Risotto

Great risotto is a labor of love that can’t be rushed or faked. I’ve seen many different recipes for “quick and easy” risottos, some that even use a microwave (gasp!). Such culinary sins shall not be condoned on this site. However, did you think that the amazing black truffle risotto with wild forged mushrooms you had at Restaurant Fancy Pants the other night was made to order? Not likely.

 
With a cooking time of at least 25 minutes or more, restaurant chefs would never be able to make risotto “to order”. What follows is a basic restaurant technique for “pre-shifting” risotto. This will allow you to cook it ahead of time, and finish it “to order”.
 

  • Begin by starting your risotto with the basic technique stated at the top of this article.

  • Cook the Arborio rice until it starts to soften, but stop just before it becomes truly “al dente”.

  • Pour risotto out onto a buttered baking sheet and spread into a thin and even layer.

  • Cool in your refrigerator.

  • When you’re ready to finish your risotto, say, after your dinner guests have arrived and consumed a couple glasses of good wine, bring your cooking liquid of choice (stock, water, etc.) to a simmer in an appropriately sized sauté pan.

  • Add the par-cooked risotto into the simmering liquid, and use the back of a slotted spoon to break up the individual rice kernels by pressing them down into the pan.

  • Gently simmer and stir until the risotto is reconstituted and becomes “al dente”.

  • Finish with butter, fold in whipped cream (if you dare), season to taste, and add any other flavorings you wish, such as parmesan, truffle oil, etc.

  • Watch your friends marvel at how quickly you were able to make an amazing tasting risotto.

10 Tips For Surviving A Professional Kitchen

Walking into a new kitchen for the first time can be an extremely scary thing. Each professional kitchen has its own culture and way of doing things. If you take one misguided step, you risk embarrassing yourself - not to mention possibly ending up in the ER with a chef-inflicted knife wound.  To help you make a good first, and lasting impression, and to avoid costly doctor bills, here are my top ten tips for surviving a professional kitchen.

1) Always Stay Calm.

This is much easier said then done. Professional kitchens are extremely high stress environments and it takes discipline and nerves of steel not to freak out. When someone in my kitchen is nervous, it makes me nervous and it makes the chef really nervous. We can smell your fear like a pack of wild dogs tracking an injured animal. Even if you're freaking out on the inside, you need to project a calm exterior; this will show that you have confidence in yourself and your abilities. Also, it's not your job to start screaming at one of your fellow cooks or the wait staff. (Let the Sous Chef or Chef handle that one.) I know Mr. Wanna-Be-Tom-Cruise-Waiting-Tables-Until-He-Gets-His-Big-Break is a smug, arrogant prick. He wouldn't know good food if you force fed him a French Laundry tasting menu. Guess what, he's not your problem! So calm down and focus on the food before the chef kills you.

2) Move Deliberately And With Efficiency.

This point can not be over stressed. In a professional kitchen efficiency of movement is key. A dead giveaway that you're a "shoemaker" is when you start running around the kitchen like a damned chicken with its head cut off. Take a moment to collect your thoughts, gather your product for prep, and cut out any unnecessary movements. Here's a tip: anytime you have to pick something up or put it down, that's considered a step. Break your production into small steps to minimize movement and maximize speed and efficiency. I once had a sous chef that anytime he saw me working inefficiently, he would come up, put his arm around me and say, "Let me tell you the story of this guy named Henry Ford..."

3) Always Ask For Clarification.

If you're not clear on a task that has been assigned to you, ASK! Sure, if you make a habit of this, it will probably piss the chef off because it shows that you're not paying attention. However, the worst thing you can do is to be unsure about a task or technique and end up preparing the food wrong. Great kitchens are all about consistency. Trust me, you're much less likely to get smacked upside the head with a hot saute pan when asking for clarification than for screwing up the chef's food.

4) Don't Pretend You Know More Than You Do.

Don't BS people about your knowledge or experience. If anything, you need to under promise and over deliver. Professional cooks and chefs are an extremely egotistical bunch; there's a lot of pompous talk about talent and knowledge. Learn to walk-the-walk before you talk-the-talk.  Also, stop trying to impress people with French culinary terms. If they're applicable in the conversation, then use them. However, don't start throwing out some terminology to try and impress the chef. He'll be plenty impressed if you can learn the food and produce a consistent product.

5) Be Aware of Your Surroundings.

A kitchen is a crowded, hectic place. Let people know where you are at all times. Yell "corner" when walking around a corner. Say "Behind You" when walking behind someone. Say "Sharp" if you're walking by someone with a sharp knife and say "Hot" if you're walking around the kitchen with a hot pot. Not adhering to these rules is considered rude and dangerous, not to mention that it's a dead giveaway that you haven't spent much time in a professional kitchen. For a seasoned pro, these “call outs” are second nature. Chefs have been known to body check cooks into stoves when they try and walk behind them on the hotline without saying "Behind."

6) Do Your Homework.

Most restaurants have web pages complete with their menus. Read the menu and do research on any terms or dishes that you're not familiar with. Also, Google the restaurant name and the Executive Chef's name and read any article or web page to better understand what you're getting yourself into. This should be done before you even apply for the job. Make sure you're familiar with the restaurant, their food, and the chef's reputation before stepping foot into a new kitchen.

7) Shut Up And Stop Brown-Nosing!

When you first start in a new kitchen, try not to talk unless spoken to, or ask a direct question about the food or the current task at hand. Learn the cultural dynamics of the kitchen before you open your mouth and make a fool of yourself. The easiest way to alienate yourself on the first day of your new job is by being a “Chatty Cathy”.  And for God's sake, DON'T BROWN-NOSE! If you want to gain the chef's favor, keep your mouth shut, work hard, and follow the tips in this article. Trust me, the chef already knows how awesome he is, even if he really isn't.

8) Be Clean And Organized.

Always keep your station clean and organized, and be sure to put everything in its proper place before moving onto another task. Keep all your product organized around your work station, and try to keep your jacket and apron as clean as possible. You can usually identify the pecking order of any kitchen by how dirty the aprons and jackets are. The dirtier the jacket, the lower down the totem pole they usually are.

9) Limit Your Vices.

This may seem like a strange tip if you've never worked in a professional kitchen. The fact of the matter is, people who work in restaurants tend to be a hard- partying bunch. If you've spent anytime in the industry, chances are you've seen your fair share of extremely talented individuals self-destruct because of problems with alcohol and drug abuse. You'd be surprised how much of an advantage you'd have over other people in the industry if you're not constantly showing up to work hung over or drained from other forms of degenerate partying.

10) Have A Purpose.

Working in a professional kitchen requires so much time, effort, and energy that you will not last if you don't have a purpose for being there. Maybe it's to study under a great chef, or to see how the restaurant is managed. Whatever it is, make sure the restaurant you work at is moving you towards your culinary goals. You do have a goal, don't you? You better, because if you don't, you're doomed to be a miserable failure.

What Is Your Tip? Do you work in a professional kitchen. What tips do you have for surviving this crazy line of work? Click on the comment button below to let me know.

How To Fry Herb Leaves In The Microwave

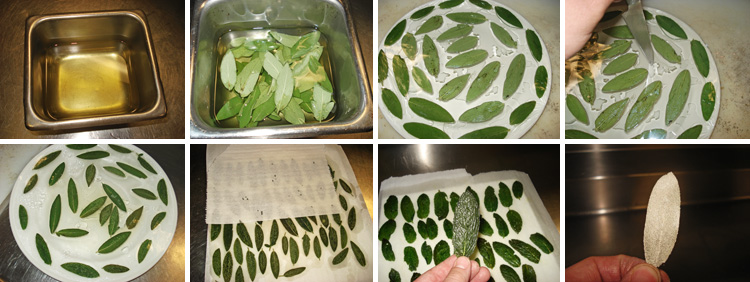
Fried herb leaves are a garnish that has been around for ages. This technique, however, is lesser known than that of just throwing some herb leaves into hot oil. The problem with oil frying your leaves is that they will curl up, and usually turn brown. Using a microwave to fry your herb leaves for garnish will allow you to keep them nice and flat.
 

  • Start by picking the herb leaves that you want to fry and dipping them in canola oil. Here I'm using sage leaves, but mint and basil also work great.
  • Take an oven safe plate with a slightly raised rim and stretch a piece of plastic wrap over it so that it is nice and tight.
  • Take your herb leaves that were dipped in oil and spread them out on top of the plastic wrap.
  • Cover with another piece of plastic, wrapping it securely around the plate.
  • Poke a couple of holes in the plastic, and then microwave on high for about 3-4 minutes.
  • Carefully remove the plate from the microwave using a thick towel or an oven mitt. The plate will be extremely hot.
  • Once the plate has cooled enough to handle, carefully remove the top sheet of plastic wrap and lay the herb leaves between paper towels to dry.

The reason why this works is because of how microwaves interact with the water molecules in the herb leaves. The microwaves start knocking the water molecules around which in turn start pushing the oil molecules around. Since heat is nothing more than a measurement of molecular movement, the oil in which the herb leaves were dipped heats up and "fries" them.
 
A nice little touch is to brush the herb leaves with gold dust, especially if used for a dessert garnish.

Pages

Subscribe to RSS - blogs