Error message

  • Notice: Trying to access array offset on value of type int in element_children() (line 6435 of /home2/cheffrog/public_html/newsc/includes/common.inc).
  • Notice: Trying to access array offset on value of type int in element_children() (line 6435 of /home2/cheffrog/public_html/newsc/includes/common.inc).
  • Notice: Trying to access array offset on value of type int in element_children() (line 6435 of /home2/cheffrog/public_html/newsc/includes/common.inc).
  • Notice: Trying to access array offset on value of type int in element_children() (line 6435 of /home2/cheffrog/public_html/newsc/includes/common.inc).
  • Notice: Trying to access array offset on value of type int in element_children() (line 6435 of /home2/cheffrog/public_html/newsc/includes/common.inc).
  • Notice: Trying to access array offset on value of type int in element_children() (line 6435 of /home2/cheffrog/public_html/newsc/includes/common.inc).
  • Notice: Trying to access array offset on value of type int in element_children() (line 6435 of /home2/cheffrog/public_html/newsc/includes/common.inc).
  • Notice: Trying to access array offset on value of type int in element_children() (line 6435 of /home2/cheffrog/public_html/newsc/includes/common.inc).
  • Notice: Trying to access array offset on value of type int in element_children() (line 6435 of /home2/cheffrog/public_html/newsc/includes/common.inc).
  • Notice: Trying to access array offset on value of type int in element_children() (line 6435 of /home2/cheffrog/public_html/newsc/includes/common.inc).
  • Notice: Trying to access array offset on value of type int in element_children() (line 6435 of /home2/cheffrog/public_html/newsc/includes/common.inc).
  • Notice: Trying to access array offset on value of type int in element_children() (line 6435 of /home2/cheffrog/public_html/newsc/includes/common.inc).
  • Notice: Trying to access array offset on value of type int in element_children() (line 6435 of /home2/cheffrog/public_html/newsc/includes/common.inc).
  • Notice: Trying to access array offset on value of type int in element_children() (line 6435 of /home2/cheffrog/public_html/newsc/includes/common.inc).
  • Deprecated function: implode(): Passing glue string after array is deprecated. Swap the parameters in drupal_get_feeds() (line 394 of /home2/cheffrog/public_html/newsc/includes/common.inc).
  • Deprecated function: The each() function is deprecated. This message will be suppressed on further calls in menu_set_active_trail() (line 2394 of /home2/cheffrog/public_html/newsc/includes/menu.inc).

Latest Articles and Blog Posts

A Tasting of Sea Food | July 11th, 2015

fish and seafood tasting menu

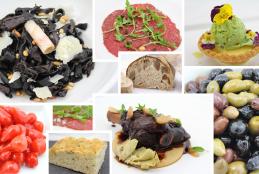
For this Stella Underground, we decided to go all fish. One of my favorite summer dishes is a simple ceviche. Fresh diced fish mixed with lime juice, maybe sometimes a little tomato paste, or dare I say even a tiny bit of ketchup for sweetness. Add in diced tomato, red onion, and cucumber, a good amount of chopped cilantro, and adjust final seasoning with salt and a little bit of sugar to balance the acidity.

Brioche Bites

Brioche Bites

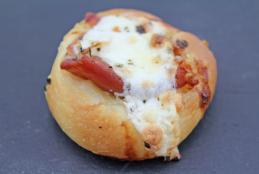
Gooey. Salty. Chewy. Rich. Delicious. These little brioche bites are an awesome party appetizer which can easily be baked a couple hours in advance. When you're ready to serve, simply refresh in a 325°F/162°C oven for about 5 minutes.

American Classics Reimagined | July 2nd & 3rd, 2015

American Classics Reimagined

What is there to say about American food? The topic is so broad, it's hard to even know where to start. In honor of independence day, we wanted to pay homage to some of our favorite American flavor profiles while still creating a unique yet playful dinning experience. 

Italian Inspired - Stella Underground Dinner, June 18th, 2015 Photo Wrap Up

Italian Inspired Tasting Menu

It all started with squid ink pasta. Alex brought it up in our menu meeting and we started riffing from there. Below is our multi-course, Italian inspired menu served on June 18th, 2015. Thanks to everyone who attended the dinner; we had a blast hanging out and cooking for you.

How to Make Baking Molds Using Tinfoil

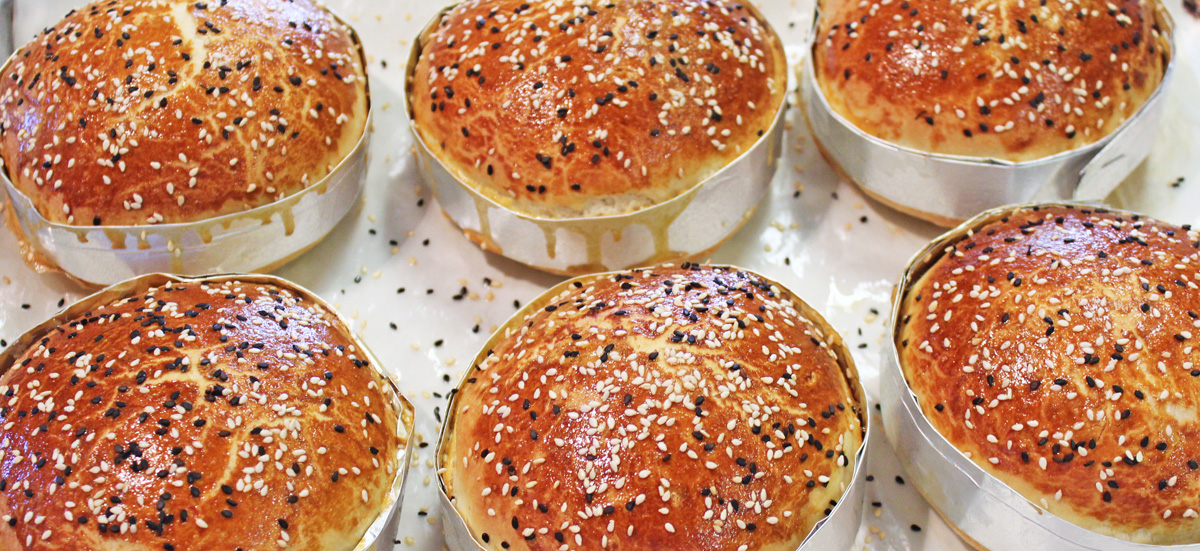
When baking hamburger brioche buns or sandwich rolls, it's sometimes desirable to use a mold. This will allow the buns to rise individually and hold their shape throughout the baking process.

This is especially important when baking hamburger buns since any outward expansion during baking will result in a larger diameter than desired, throwing off your burger to bun ratio.

If you plan on making lots of hamburger buns on an ongoing basis, you may wish to opt for metal tart rings scaled to your desired diameter or a specialty brioche bun pan. This recommendation is meant more for a professional kitchen that will need to produce over 50 brioche buns on a daily basis. Although the tinfoil rings are re-usable, they will build up gunk and have a hard time keeping their shape for more than a few bakes, making a tart ring a more convenient approach.

However, if you're just casually dabbling with brioche buns, making the rings out of foil is incredibly simple, and doesn't take much time when only making a few. Add to this the versatility of being able size the ring to any diameter you want, and its clearly the best option for low production environments such as the home kitchen or restaurants that want to run a special.

The Process

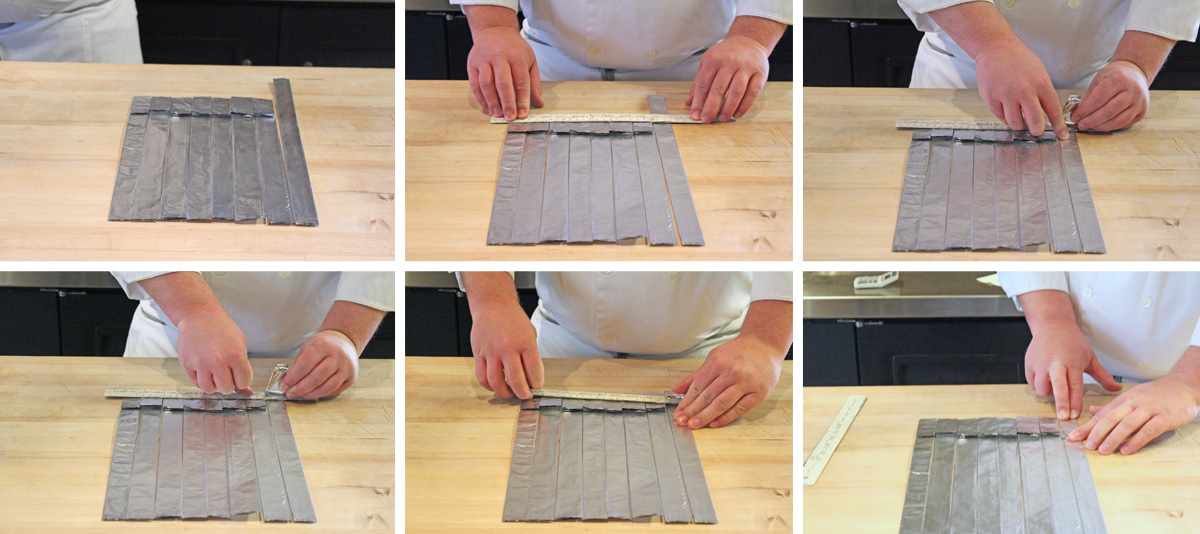
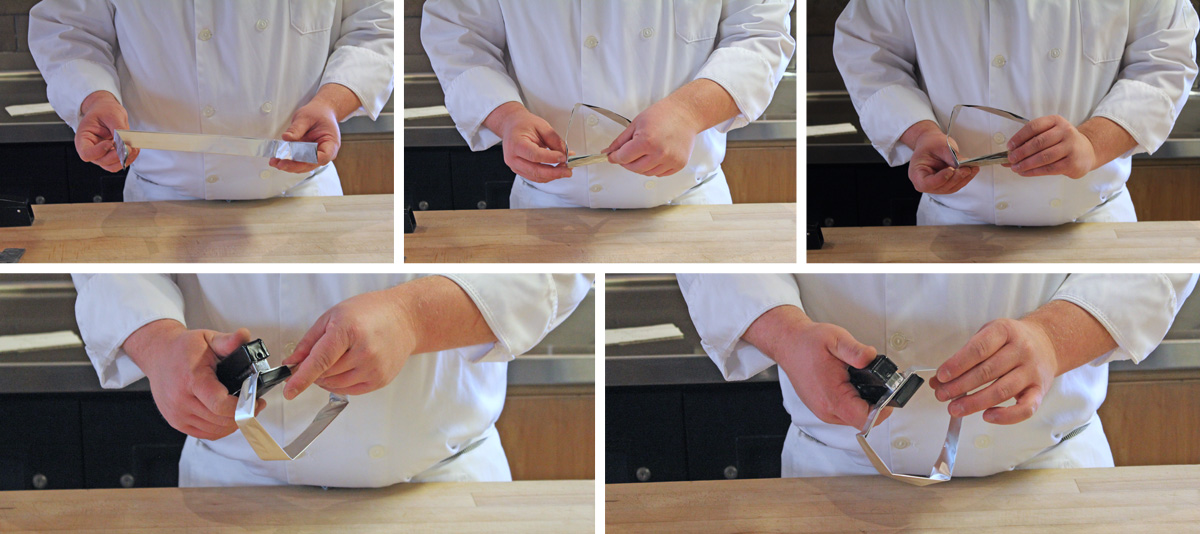
Start by pulling out a sheet of tinfoil, about 14-16 inches in length, and laying it lengthwise on your work surface. Fold the bottom third upwards into the center and crease. Repeat with the top third, folding it down into the center, and creasing.

Tinfoil Baking Rings Step 01

Continue this pattern of folding the bottom third up and the top third down, creasing as you go, until you're left with a strip of foil with a width of about 0.75 inches.

Tinfoil baking rings step 2

Make one final fold, folding the tinfoil strip in half horizontally and creasing firmly.

Tinfoil baking rings step 3

Measure the foil strip to the appropriate length, making a crease.
 

  • 4.5" Hamburger Bun = 14.25 inches

  • 4" Hamburger Bun = 12.75 inches

  • 3" Slider Bun = 9.5 inches /


Tinfoil Baking Rings Step 4

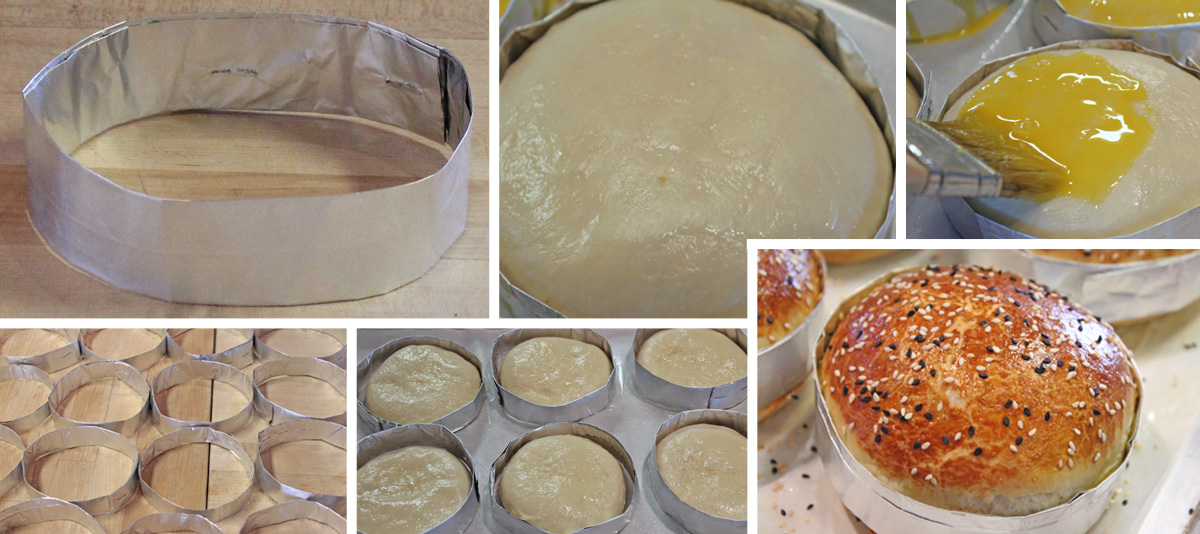
Place the long end of the foil strip inside the crease, and attach using two staples.

Tinfoil baking molds step 5

Gently pull the foil outward in a circular motion to form into a ring shape.

Tin foil baking molds step 6

Spray ring with non-stick spray, place scaled dough inside, and allow to proof before baking.

Tinfoil baking molds step 7

Quick Note on Measurements

You can create any size bun you wish just by knowing your desired diameter.

For example, if you want to make a 5" bun, you would multiply 5 inches (your diameter) time 3.14 (π). This will give you the circumference of the bun, which is also the length to which you need to measure your tinfoil strip.

5 X 3.14 = 15.7

However, while experimenting with various sized buns during the R&D phase of this project, I found that my diameter was always slightly smaller than I wanted by the time I formed the foil into a ring shape. This is because no matter how hard you try, you'll never be able to form a perfect circle.

This led me to start rounding the circumference up to the nearest quarter inch. So in the example above, 15.7 would become 15.75, or maybe even 16 inches.

I know it's not an exact science, but this will at least get you in the ball park, allowing you to adjust the overall circumference of your mold up and down as needed.

Also, in the Hamburger Brioche Bun Video (linked below), you'll notice that the vertical height of my molds are fairly deep, about .75 - 1 inch.

However, after further testing, I found that I actually prefer a more shallow mold, between .25 - .5 inches. This allows the mold enough depth to aid the bun in holding it's shape throughout proofing and baking process, but still allows for a more natural expansion during oven spring.

Related Content

Fermented Brown Rice Cracklins


In this industry, we all stand on the shoulder's of giants. As we play with ideas, techniques, and flavors, we create fun and sometimes unique derivative works that open the door to new possibilities.

In their book Ideas in Food, Aki and Alex lay out a fun play on pork cracklins using kimchi pureed with tapioca starch instead of the standard pork skin. This mixture is cooked into a loose paste, spread thin on acetate sheets, and dehydrated. After about 24-48 hours, the resulting sheet will shatter like glass, and puff when dropped into hot oil. This concept works because even though the sheet seems completely dry, there's still a small amount of water trapped inside (about 4%).

When the dehydrated sheet is dropped in 400°F/204°C oil, the small amount of residual water quickly turns to steam, exploding outward, causing the starch gel to puff. The original Ideas in Food recipe used tapioca starch for it's bland flavor (so the kimchi could shine through), but this technique remains universal for any type of cooked, starchy puree that can be spread thin and dehydrated.

A few days ago, looking to add a crunchy texture and interesting flavor to an new dish, this idea popped back into my head. I wondered, why can't I use brown rice with the same approach? And since brown rice is a whole grain, shouldn't I be able to extract more flavor if I inoculated the soaking water with a sourdough culture and let it ferment a few days?

In fact, the approach turned out to be extremely simple. I took a teaspoon of sourdough starter and dissolved it in about three quarts of water. Brown rice was then submerged in this water, and left at room temperature to ferment.

Two days later I boiled the brown rice like pasta, purposely overcooking it so the starch granules would burst. It resulted in a goopy, sticky, brown rice "congee" that I first pureed in a food processor and then passed through a tamis (fine sieve).

As it started to cool, I could already see the starchy puree start to set. I whisked in a little warm water to loosen the mixture into a paste-like consistency, and spread it onto sheets of acetate cut to fit my dehydrator trays. The mixture was dehydrated overnight and broken into small pieces.

A simple dunk in 400°F/204°C oil for about 20 seconds causes the thin sheet of dehydrated brown rice to puff into an airy, crunchy 'cracklin.' While the texture is awesome, the flavor is truly the best part. The fermented brown rice cracklin has a deep, whole grain flavor with hints of popcorn and toasted wheat berries. Sprinkled with a little bit of kosher salt fresh from the fryer, these things quickly become addicting.

Now the possibilities are endless.

First, if the brown rice is simply covered with water and allowed to ferment at room temperature for 3-5 days (instead of inoculating with a sourdough starter), this could turn into a healthy snack for people suffering from celiacs. In fact, the fermentation step isn't even necessary, although I would argue the end flavor is better.

Second, the brown rice can be cooked in any number of flavored liquids, and the resulting puree can easily absorb other seasoning or ingredients in the form of spices, liquids, purees, etc. The only limitation is the mixture needs to be extremely low in fat, or it won't dehydrate properly.

Finally, this can be applied to any number of high starch mixtures, not just brown rice and tapioca starch. And in fact, it has. If anyone has ever eaten a Cheeto, Bugle, or a bowl of Rice Krispies for that matter, you've experienced first hand the textures this technique can create.

Like I said...we all stand on the shoulder's of giants.

The Three Mother Preferments And How To Use Them

This article is part 2 of 2. Read part one here: What Is A Preferment?

Various Types of Preferments

Preferments can go by many different names including chef, levain, sponge, madre bianca, mother, biga and poolish. But in my opinion, there are three major approaches to preferments that will encompass all others, much like classic French sauces are mostly derivatives from the Five French Mother Sauces. To help you better understand the three major approaches to preferments, I give you the “Three Mother Preferments” (somewhere out there, a French Baker just face palmed himself, and my life is now complete). These three “mother preferments” are poolish, biga and pâte fermentée.

Poolish Preferment

Sometimes referred to as a sponge or barm (although a barm is more technically a natural levain or sourdough starter), tradition has it that the term “Poolish” comes from Polish baker’s in Vienna who developed the technique of prefermentation, later adopted by French bakers. And although I’m always eager to annoy French baker’s and chefs, there really is no solid, historical evidence of where the term “poolish” originated.

What we can agree on however is the poolish style preferment is the most common approach used by enthusiasts and professional bakers alike, mainly because it’s high hydration allows the yeast to propagate at a constant pace, and it’s incredibly easy to apply a preferment to any bread recipe since it contains a 1:1 ratio of flour and water (which makes final bread dough calculations intuitive, especially when converting various bread recipes that don’t utilize a preferment).

Based on the baker’s percentage, a poolish starter will have 100% hydration and .2% yeast (always based on the flour’s weight).

This means the basic formulation for a poolish preferment is:

  • 500g Flour - 100%

  • 500g Water - 100%

  • 1g Yeast* - 0.2% (either active or instant dry)

*Because cake yeast (commonly only found in professional bakeries) is less dense with yeast microbes than active or instant dry, you can up the percentage to 1% to get the same results.

Now I do realize this seems like a lot of preferment for the home baker, and it is, but using these numbers you can at least visualize the ratios through the baker’s percentage. If you want to make a smaller poolish preferment and don’t have a gram scale accurate to the 10th of a gram, then a simple, one finger pinch of yeast will do. For example, if I was making a preferment for one or two loaves of bread, it would probably look something like this:

  • 200g Flour

  • 200g Water

  • Pinch Yeast

Once mixed, a poolish style preferment will be ready to use in about 12-18 hours, assuming an ambient room temperature of 68-72°F/20-22°C and your yeast usage doesn’t exceed .2% based on the flour’s weight. Remember, the more yeast used and the hotter your room temperature, the sooner your preferment will be ready (which isn’t necessarily desirable since the whole purpose of a preferment is to slow down the fermentation process). For every 17°F/9°C your room temperature raises or drops, the yeast activity will be doubled or cut in half, taking the yeast half the time or twice the time respectively to achieve the same amount of fermentation.

For more information on incorporating a poolish style preferment into your bread doughs, please see “The Basics of Using a Preferment” at the end of this article.

Biga Preferment

This style of preferment was developed by Italian bakers, and in Italy, a Biga refers to any style of preferment that contains flour, water and yeast, no matter the percentages. However, it’s more common for a Biga to have less hydration than a poolish. For the sake of understanding various approaches to preferments, Biga’s are low hydration (stiffer) and take longer to finish fermentation as compared to a poolish containing the same percentage of yeast. This is because yeast’s movement is impeded by lower hydrations, taking them longer to propagate and consume all the starches contained within the bread dough.

This is why Biga Preferments will usually, but not always, contain more yeast based upon the flour’s rate (about 1%) than a wetter style of preferment like a poolish. At the one percent use rate, a biga preferment left at a standard room temperature will be ready to use in about 14-18 hours. The basic formulation for a biga starter is:

  • 500g Flour - 100%

  • 300g Water - 60%

  • 5g Yeast - 1%

While this is a common formulation for a biga starter, the yeast percentage and hydration rate can vary depending on the baker and the final application of the preferment. However, in the spirit of separate approaches, low hydration starters will take longer to ferment than a poolish, which is why the yeast percent is raised to 1% for the former instead of .2% for the latter.

Anecdotally speaking, this stiffer dough can stand up to longer fermentation times, especially if the yeast percent is lowered, creating more complex flavors via acetic and latic acid production, the same acids responsible for sourdough’s complex flavor and aroma.

Once a biga preferment is airy and full of life (and expanded by about double it’s original volume), it can then be incorporated into the final dough formulation by cutting into small pieces, mixed with the rest of the recipe’s liquid, and then incorporated into the remaining ingredients. This will ensure an even dispersion of yeast contained in the preferment, resulting in better bulk fermentation and proofing.

Pâte Fermentée (Chef, Old Dough)

The “old dough” or pâte fermentée style of preferment is extremely convenient if you’re baking the same bread recipe on a regular basis. This approach was championed by famed French baker Raymond Cavell who credited this method with adding complexity of flavor and increased oven spring to his world famous baguettes.

The basic concept is simple; up to 1/3 of bread dough is reserved after the bulk fermentation to levin the next batch of bread. So in the case of a classic baguette, the first time the recipe is made, flour, water, yeast, and salt will be mixed together and allowed to bulk ferment.

After the bulk fermentation is complete, the dough is punched down, one third is reserved to levin the next batch of bread, while the rest of the dough is scaled, formed, proofed, and baked.

This old dough can be stored for about 8-12 hours at room temperature or retarded in the refrigerator for up to 3 days. It can also be frozen for up to 6 months, removing from the freezer and allowing to thaw fully (about 12-16 hours at room temperature, (24-36 hours in the fridge depending on the dough's volume) before using it to levin a batch of bread.

The Basics of Using a Preferment

Now that you understand what a preferment is, why they’re beneficial to bread baking, and the three major approaches, let’s talk about how to actually apply this knowledge to any bread recipe.

In general, 1/4 to 1/2 of a bread recipe’s total flour will be used to create a preferment. The amount of liquid depends entirely on what approach you’re using from above (low hydration biga, high hydration poolish, or pâte fermentée).

The amount of pre-ferment used will depend on how long you want the bulk fermentation process to take, after it's incorporated into the the rest of the ingredients. In general, when half of the dough's flour comes from a preferment, you can count on a 2-4 hour bulk fermentation and a 1-2 hour proof.

Let's use our basic baguette recipe to put this into perspective:

  • 800g Flour - 100%

  • 520g Water (Warm) - 65%

  • 7g Yeast (Active Dry) - .8% Yeast

  • 16g Salt - 2% Salt

The original recipe uses the direct method, meaning the ingredients are mixed together, allowed to bulk ferment, shaped, proofed and baked (scalable recipe - video recipe).

To add extra complexity of flavor, we’ll remove half of the recipe’s flour and create a poolish style preferment, transforming our recipe into something like this:

Preferment

  • 400g Flour

  • 400g Water

  • Pinch Yeast

Mix ingredients together, place in a container large enough to allow the preferment to at least double in size, and allow to ferment at room temperature (68-72°F/20-22°C) for 12-16 hours (or retard in fridge for up to 3 days).

The next day, mix the preferment with the remaining ingredients:

  • 400g Flour

  • 120g Water

  • 16g Salt


Follow the baguette recipe as normal. Remember, your bulk fermentation and proofing stages might take a little longer than normal, about 3 and 2 hours respectively, but your patience will be rewarded with a superior baguette. Obviously the fermentation can be delayed further by using less preferment, retarding the bread during bulk fermentation or proofing, or all of the above. Again, the longer the fermentation and proofing process, the more complex the bread will be, until the yeast consume all the available food, causing them to die.

To convert the above baguette recipe for use with a biga style starter:

  • 400g Flour

  • 240g Water - (400 X .6 = 240g or 60% Hydration)

  • 4g Yeast - (400 X .01 = 4g or 1%)

Mix ingredients together until they form a shaggy dough. Leave at room temperature and allow to ferment for 14-18 hours (or retard in fridge for up to 3 days).

The next day, mix with:

  • 400g Flour

  • 280g Water

  • 16g Salt

Once ingredients are kneaded together, follow the baguette recipe as normal, with the expectation of your bulk ferment and proofing stages taking a little longer.

To use the pâte fermentée method, you can simply reserve 1/3 of the baguette dough recipe, but this will also decrease the overalll yield. If you want to have the same yield every time (4 baguettes), then scale each ingredient by 1.5. For example, our above baguette recipe adds up to 1336g total dough weight. Here's how the math looks

800g X 1.5 = 1200g Flour
520g X 1.5 = 780g Water
 16g X 1.5 = 24g Salt
   7g X 1.5 = 10.5 Yeast
_____________________________________
1336g X 1.5 = 2004g Total Dough Weight

  • 2004 X .3 = 668 (this is the amount pate fermente you must remove and save for the next batch).

  • 668 X 2 - 1336

So as you can see from the above example, scaling any bread recipe by 1.5 will allow you to remove 30% of the dough to be used as a preferment in your next batch, while resulting in the same total yield from bake to bake. Even though 1/3 is technically 33%, scaling a recipe by 1.5 and then removing .3 is easy to remember, keeps your numbers round, and the extra 3% is negligible.

The portion of the dough removed can be stored at room temperature if you plan on baking the same bread in the next 12-18 hours, in the fridge up to 3 days, or the freezer for up to 6 months.

The final baguette recipe would be:

  • 668g Pâte Fermentée (Old Dough)

  • 800g Flour

  • 520g Water

  • 16g Salt

  • Yeast - Optional, depending on how fast you want the bread to rise, or how avtive your old dough looks. If it's a little past it's prime or you want a faster, more dependable rise, add 7g of yeast.

You might also be interested in the following:

Podcast Episodes


Videos - Visit Our Bread Baking Video Index

What Is A Preferment?

Preferments

Preferments leverage one simple fact; longer and slower bulk fermentation and proofing stages make for better bread. This is accomplished by taking a portion of a bread recipe’s flour and liquid, “spiking” with a very small amount of yeast, and allowing this mixture to ferment at room temperature over the course of 12-18 hours, and sometimes as long as a few days if retarded under refrigeration.

Using a preferment would fall under the classification of the “in-direct method,” because there’s an intermediate step between the mixing of ingredients and bulk fermentation. Just like we discussed in Episode 20, “The Classifications of Bread,” the in-direct method slows down fermentation by the utilizing preferments or retarding doughs during the bulk fermentation process, resulting in a more complex, flavorful bread.

This is opposed to most modern bread recipes formulated for many cooks who tend to prize convenience over flavor. Most recipes use large amounts of yeast which allow you to bulk ferment the bread dough in two hours and proof in less than one. And while these recipes will still produce fresh baked bread that will fill your house with beautiful aromas and have a quality that easily rivals the soulless, pre-sliced, baked-batters found at your local supermarket, it will be no where near the quality which can be achieved through delayed fermentation.

“But Jacob, it takes so long to bake bread using a pre-ferment!”

No, not really. In fact, the actual time you spend mixing the dough  doesn’t change. The only thing that changes is the passive time required to do a pre-ferment, meaning having the foresight to mix a portion of the flour and water a day or two in advanced before baking bread.

What the argument really comes down to is planning ahead. In fact, I’ve gotten many negative YouTube comments on my bread baking videos, all which say pretty much the same thing: “This takes too much time, it’s too involved, that’s what supermarkets are for, etc.”

If that’s your mind set, than I’d venture to guess you’re in the majority, simply based on the complete saturation of “quick, easy, simple, 30 minutes or less,” recipe books and TV shows. And please don’t get me wrong; there’s nothing wrong with quick and easy recipes, but the approach isn’t universal to all forms of the culinary arts.

There is no quick and easy approach to charcuterie, the fermentation of grapes into world class wine, and the baking of great bread. But then the people who pursue these subjects aren’t worried about quick and easy, because our reward comes to us during the process, with the finished product being the tangible expression of the journey, which true cooks cherish above the destination.

If you’re not willing to plan ahead, then preferments and baking great bread aren’t for. But if you’re willing to be patient and draw the process out over the course of a couple of days, the use of a preferment or “natural levain” (i.e. sourdough starter), will instantly elevate the quality of your breads.

Why Use a Preferment?

Because fermentation is extended, the yeast and natural enzymes present in flour have time to take action on the starches and proteins in the dough, releasing a larger amount of food supply for the yeast to ingest and turn into energy. This has a couple of distinct benefits:
 

  • It tastes better. The general rule of thumb is the longer the bread is allowed to ferment, the more complex and delicious the finished flavors will be. This does have a law of diminishing returns however; any preferment older than 3 days that hasn’t been refreshed with fresh flour and water is likely to have a weak and dying yeast population which can give your bread off flavors and poor rising ability.

  • Preferments add extensibility to bread doughs, making them easier to form, and resulting in a superior oven spring. In fact, preferments have been shown to increase the oven spring of baguettes by as much as 10%, which results in an airier, lighter crumb.

  • Delayed fermentation will also slightly drop to the pH of bread, extending it’s shelf live without the necessity of “dough conditioners” or preservatives.

Are you convinced you need a preferment in you're baking arsenal? Then get started by reading our guide "The Three Mother Preferments and How To Use Them." We also cover this topic extensively in The Stella Culinary School Podcast Episode 21| Sourdough Starters and Preferments.

You might also be interested in the following:

Podcast Episodes


Videos - Visit Our Bread Baking Video Index

The Whirlwind of "The Vote"

As most of you already know, I've been nominated by Food And Wine Magazine for "People's Choice Best New Chef." As a small town chef in Truckee, the nomination came as a surprise, especially when I saw who else was listed in the California Region, including Thomas McNaughton of Flour + Water and Matthew Accarrino of SPQR; two very talented chefs in San Francisco who have achieved much acclaim.

When I made the decision to leave San Francisco early on in my career, I knew full well that I was sacrificing all the tools, experience, and connections that working in the city would offer, but the trade-off was more than fair. Being able to call the Tahoe/Truckee area my home for the last six years has been a reward in itself. Yet the fact that a national publication like Food and Wine has the town of Truckee on its map is what makes this nomination both exhilarating and humbling. I, like many other ex-city-dwellers who now call Truckee their home, have always believed in this region as a world class end destination. We live where people spend all year planning to vacation, and if you're in the service industry like me, you have the extra reward of creating memories that in some cases will literally last a lifetime.

It would be a bit insincere to say I wasn't slightly caught off guard by the whirl-wind of attention that this nomination has stirred up. The highlight so far was being interviewed by Beth Ruyak of Capital Public Radio in Sacramento, especially since I've always been a bit of an "NPR Nerd" and had an interest in radio broadcasting growing up; an interest which led me to share my passion for cooking through an audio podcast of my own. As you can imagine, doing a podcast is one thing, but being on live radio, where any verbal mistake will be instantly broadcasted to a countless number of nameless, faceless listeners was absolutely nerve racking. Listening back to the interview was a cringe fest; I was way too close to the mic (but couldn't tell because I had no head phones) and was talking a mile a minute, all the while trying to drown out the voice in my head saying, "Jacob, you do realize that you're totally bombing on live radio, right?" As a guy who's fairly good at operating under pressure (at least in a restaurant environment) being live on the air with a personality I remember watching on TV when I was a little kid was the closest thing I've had to a panic attack since my wife went into labor.

Yet despite my nerves and the desperate desire for a "mulligan," being on live radio was one of the highlights of this nomination; that, and the "beehive" that is San Francisco dining getting kicked around for the first half day of voting when they saw some no-name chef tucked away in the hills of Lake Tahoe leading the polls. We even got a nod from The San Francisco Chronicle's Inside Scoop Columnist Paolo Lucchesi saying "In a huge upset over the city folk so far, the guy from Truckee is winning the vote in the earlygoing." I guess that's the power of the Stella Culinary, Cedar House and Truckee/Tahoe community, who charged hot out of the gates Monday morning when the nomination was first announced.

After rallying the troops to insure "the guy from Truckee" wouldn't walk away with the top prize, Chef Thomas from Flour + Water and Chef Matthew from SPQR are currently leading the polls, with yours truly in third place. Yet considering the reach and resources of all the accomplished chefs nominated in the California region, just being in the top three, and at one point leading the polls, is a huge win for Stella, The Cedar House, and most importantly, the Truckee/Tahoe Community.

If you haven't voted yet, you can do so by following this link here: http://www.foodandwine.com/peoples-best-new-chef/california. Voting will close this Monday at 2pm PST. Please note that you can only vote once, and multiple votes from the same IP address will be deleted per Food and Wine Magazine's rules.

Also, because I've been so busy the last few days, I know that some questions and various forum topics have fallen through the cracks. I'm going to do my best to go back and answer all the cooking questions that you've sent in. If you don't see an answer in the next day or two, please remind me via e-mail: jacob@stellaculinary.com.

One of the things that I have been neglecting is publishing a fascinating guest post on Teas, Tea Pots and Brewing Methods written by Stella Culinary Community Member Marco099. The post keeps flipping a weird security glitch in my Apache servers because it contains keywords that are misinterpreted as malicious commands. Anyways, while I try and work this glitch out with my hosting company, I thought I’d post a PDF download link here for your reading pleasure. A special thank you to Marcos099 for all the hard work he put into writing this great post, for nothing more than the ability to share his passion with our small community. And that, in the end, is what Stella Culinary is all about.

Thank you to everyone that's voted so far, the loyal and passionate people who make up the Stella Culinary Community, and of course the staff at The Cedar House Sport Hotel and Stella Restaurant, who are the ones that make a nomination like this possible through their hard work and dedication.

Cook With Passion!

Jacob

Stella's Culinary Boot Camp Wrap Up

Stella's Culinary Boot Camp - November 2012

Stella's first culinary boot camp was an amazing time, bringing people from across the United States and Canada together with one singular goal; to become better cooks. This intensive five day course was constructed to challenge and push the students to their limits, debuting our new core curriculum, the F-STEP cooking process.

The F-STEP curriculum was designed to train the students how to think like a professional chef, not just blindly follow recipes. In fact, most of the recipes in the boot camp curriculum were changed daily and "on the fly," forcing the students to utilize their newfound understanding of flavor structure and technique.

On the last day of class, our twelve student boot camp was split up into six teams of two, with each team being responsible for creating their own unique dish as part of a six course tasting menu. This final exam required the students to go through the F-STEP thought process, thinking about Flavor, Sauce, Technique, Execution, and Preparation. Each student had to time the execution of their dish to fit perfectly within the structure of our six course tasting menu.

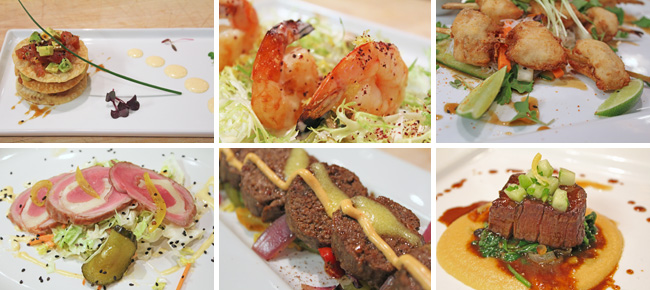
What the students ended up producing was nothing short of impressive, as you'll see in the photos below. All dishes and their corresponding recipes were designed, prepared and executed by the students on their final day of class, with each team being responsible for completing a composed tasting portion and a family style plate.

Carrot Puree

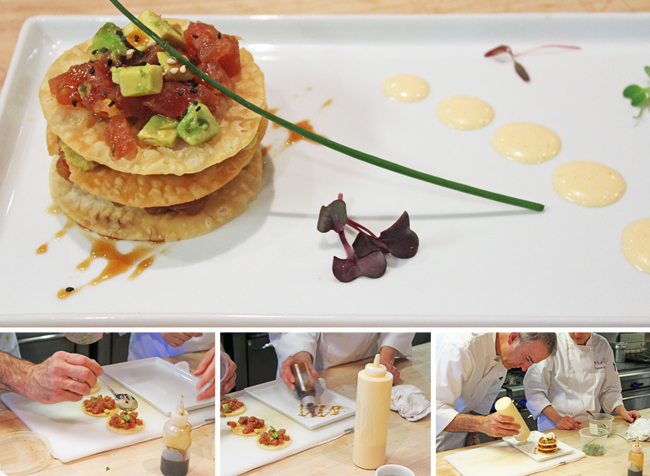
Cynthia and Marty kicked off our six course tasting menu with a chilled carrot-ginger puree as their amuse bouche (above). Their first course was an "ahi tartar napoleon with avocado, sesame, crispy wontons, and spicy-asian aioli" (below).

Composed Ahi

For their family style plate up, Marty and Cynthia painstakingly wrapped the wonton skins around a wooden rolling pin and deep fried them in the shape of a shot glass, which they then filled with the tartar mixture (below).

Ahi Family Style

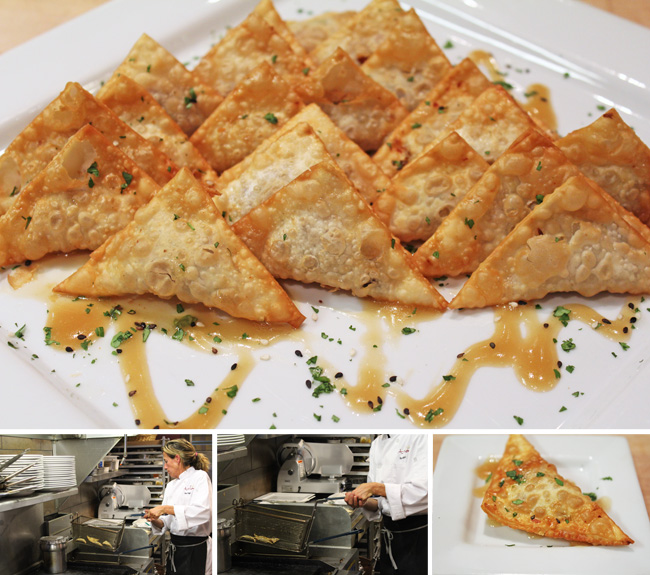
Next, Jack and Sue offered up a delicious bacon-wonton intermezzo (below).

Bacon Wontons

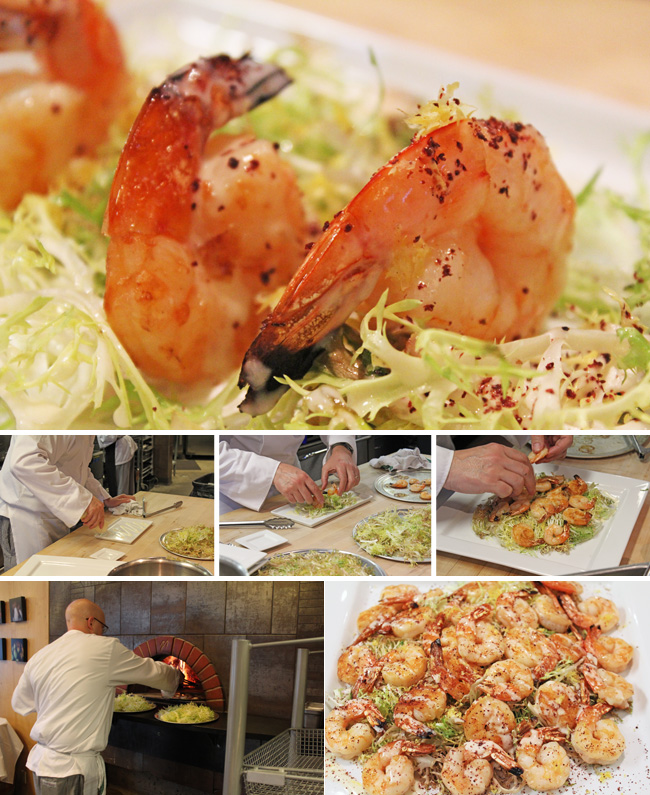
Jack and Sue's appetizer course was wood fire roasted prawns with charred frisse and sumac (below). The bitterness of the frisee balanced nicely with the sweetness of the shrimp and was tied together by the lemon tang of the sumac, a spice indigenousness to Africa.

Fire Roasted Shrimp

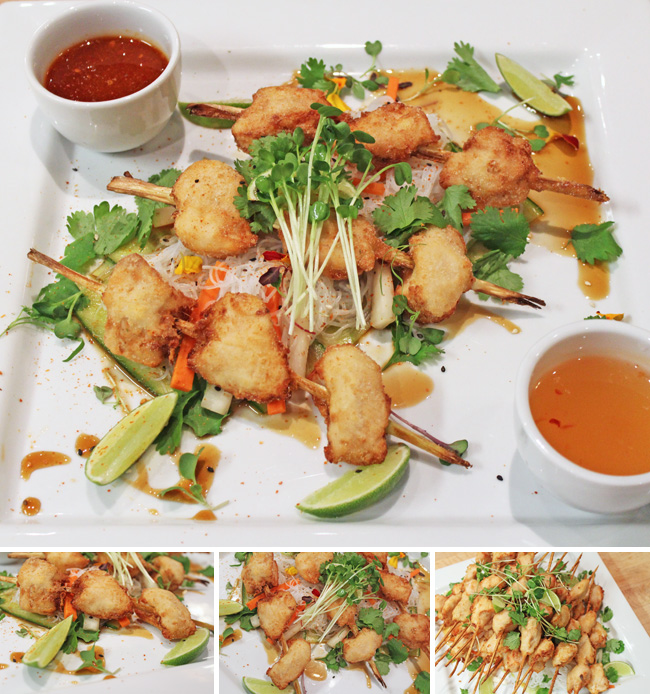
Darcy and Keith created a Vietnamese style chicken satay. The chicken was first brined and then sous vide, skewered with sticks of lemon grass, served with two separate dipping sauces and a refreshing rice noodle and pickled vegetable salad. The combination of the crispy, rice coating exterior with the tender, juicy interior, made this chicken absolutely delicious. Add in some fresh, South East Asian inspired ingredients and you have yourself a light and enjoyable dish.

Chicken Satay

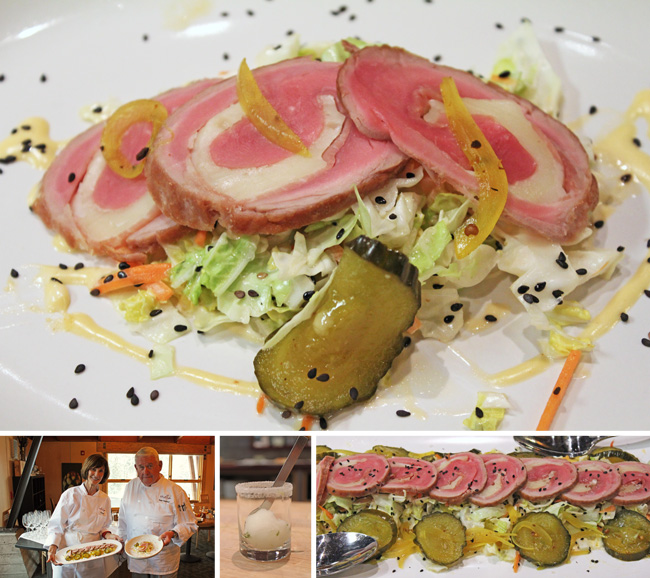
Chris and Roger served a sous vide pork tenderloin roulade, filled with provolone cheese (first photo below). Calling it the "Cuban Ruben," this dish was a fun and unique play on a traditional flavor structure with a few twists, including home made pickles, Russian dressing and a garnish of preserved lemon rind.

Sticking with their inspired theme, Chris and Roger also offered up an "mint-mojito" intermezzo in the form of a refreshing sorbet (middle photo below).

Pork Tenderloin

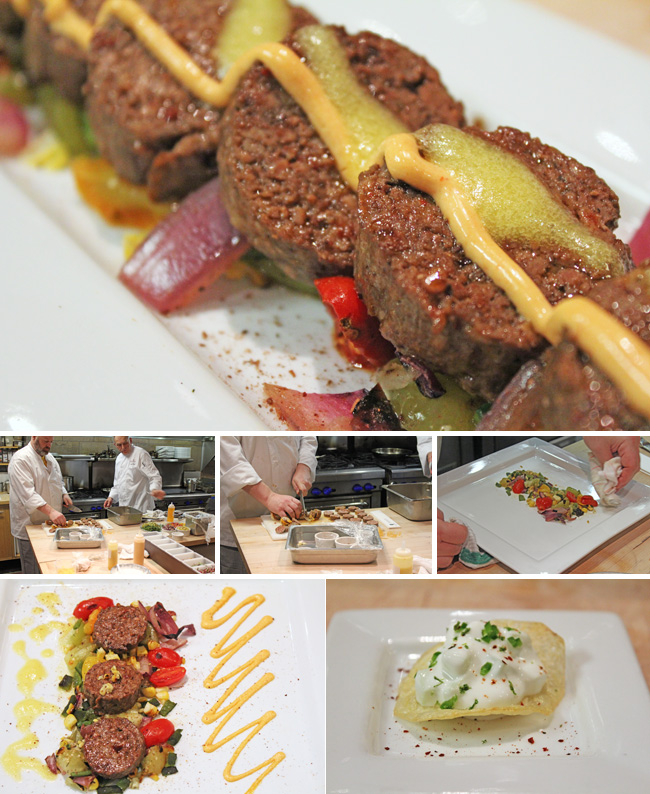
Fred and Douglas created an intermezzo of "house made potato crisps with cucumber creme fraiche dip" (pictured bottom right, below). This cooling bite was followed by their "mexican-spiced duck sausage 'on fire,' seasonal vegetables with chipotle aioli and lime-pineapple-habanero sauce." The sausage was made with ground duck breast, formed into a cylinder using plastic wrap, and cooked sous vide. The combination of the rustic-roasted vegetables and the spiced sausage was outstanding.

Duck Sausage

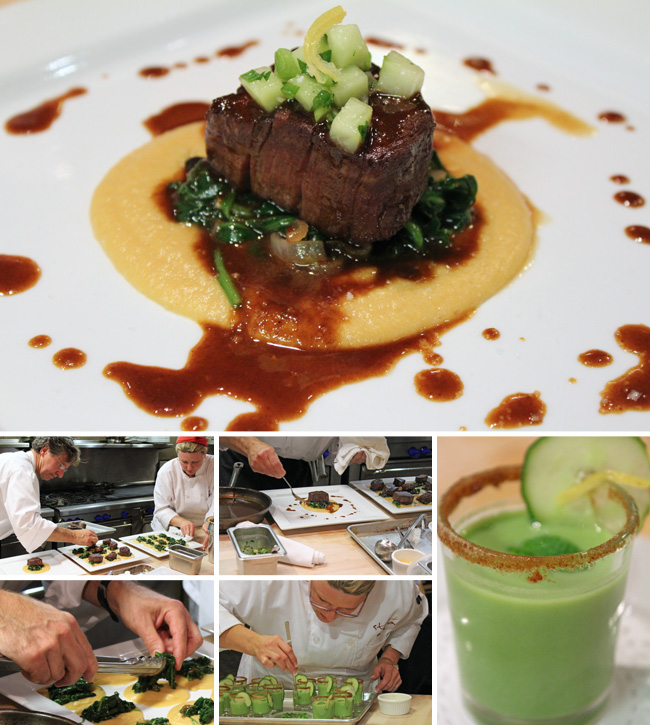
The final dish was served by Eva and Mike. For their intermezzo, they offered up a "cucumber-cumin shooter with lemon and fresh mint." This was followed by a perfectly "sous vide fillet of beef with chickpea puree, sauted spinach, cucumber salsa and thyme-wine demi glace." The chickpea puree is really what made this dish. It had a smooth texture and subtle flavor that paired nicely with the full reduction demi and the perfectly cooked fillet of beef. 

Beef Tenderloin

Thanks again to everyone who participated in this November's boot camp.

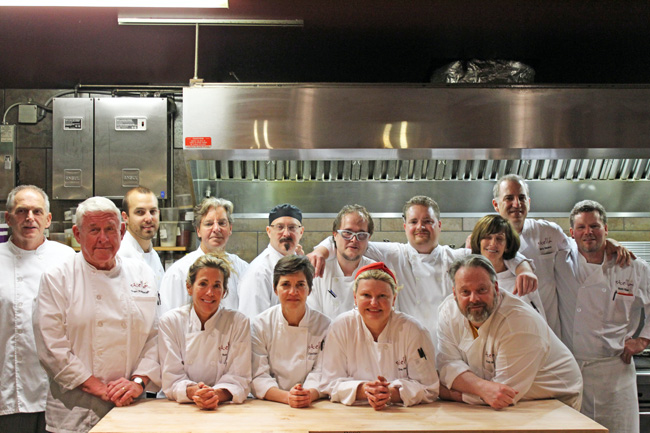
Stella's Culinary Boot Camp - Class Photo - November, 2012

If you weren't able to make it to this boot camp, don't sweat it. We plan on doing another this spring, although we have yet to set dates. If you want to be on our early notification list, please enter your name and e-mail address in the form below.

Pages