Error message

  • Notice: Trying to access array offset on value of type int in element_children() (line 6435 of /home2/cheffrog/public_html/newsc/includes/common.inc).
  • Notice: Trying to access array offset on value of type int in element_children() (line 6435 of /home2/cheffrog/public_html/newsc/includes/common.inc).
  • Notice: Trying to access array offset on value of type int in element_children() (line 6435 of /home2/cheffrog/public_html/newsc/includes/common.inc).
  • Notice: Trying to access array offset on value of type int in element_children() (line 6435 of /home2/cheffrog/public_html/newsc/includes/common.inc).
  • Notice: Trying to access array offset on value of type int in element_children() (line 6435 of /home2/cheffrog/public_html/newsc/includes/common.inc).
  • Notice: Trying to access array offset on value of type int in element_children() (line 6435 of /home2/cheffrog/public_html/newsc/includes/common.inc).
  • Notice: Trying to access array offset on value of type int in element_children() (line 6435 of /home2/cheffrog/public_html/newsc/includes/common.inc).
  • Notice: Trying to access array offset on value of type int in element_children() (line 6435 of /home2/cheffrog/public_html/newsc/includes/common.inc).
  • Notice: Trying to access array offset on value of type int in element_children() (line 6435 of /home2/cheffrog/public_html/newsc/includes/common.inc).
  • Notice: Trying to access array offset on value of type int in element_children() (line 6435 of /home2/cheffrog/public_html/newsc/includes/common.inc).
  • Deprecated function: implode(): Passing glue string after array is deprecated. Swap the parameters in drupal_get_feeds() (line 394 of /home2/cheffrog/public_html/newsc/includes/common.inc).
  • Deprecated function: The each() function is deprecated. This message will be suppressed on further calls in menu_set_active_trail() (line 2394 of /home2/cheffrog/public_html/newsc/includes/menu.inc).

Latest Articles and Blog Posts

The Five French Mother Sauces: The Mother Of All Resources

Since we covered so much ground in the French Mother Sauce Series, both on the blog and podcast, I figured it would be a good idea to place all the information in one, easy to find post. The mother of all mother sauce resources if you will.

So here it is; a list of the mother sauces with their corresponding podcast episodes, classic components, serving suggestions, and how to posts.

But first, a quick history lesson.

A Brief History of The Mother Sauces

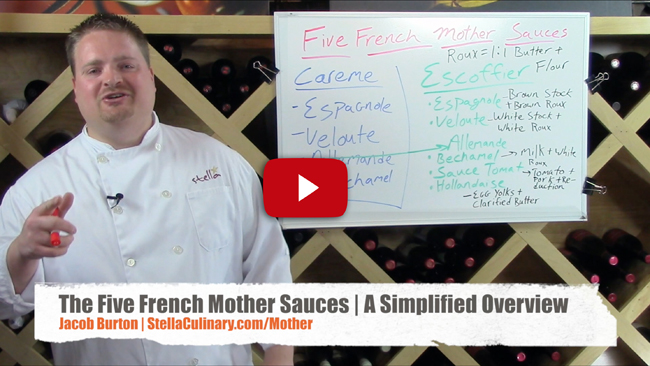
The French mother sauces were originally four base sauces set forth by Antonin Careme in the 19th century. Careme’s four original mother sauces were Allemande, Bechamel, Veloute and Espagnole.

In the 20th century, Chef Auguste Escoffier demoted Allemande to a secondary sauce of Veloute, and added Sauce Tomat and Hollandaise. 

One Last Thing…

Some of the classic versions of these sauces use different thickening agents to bring the sauce to its proper consistency. If you’re unfamiliar with thickening agents such as roux, liasons, or emulsions, you can follow the corresponding links for more information.

Sauce Bechamel
 

Sauce Veloute
 

  • Base: White Stock (Classically Veal, but Chicken and Fish Stock can also be used)

  • Thickening Agent: Classically a Roux, but sometimes also a Liason is used.

  • Classical Flavorings: None, used specifically as a base

  • Common Secondary Sauces: Sauce Vin Blanc (White Wine Sauce), Sauce Supreme, Sauce Allemande, Sauce Poulette, Sauce Bercy, Sauce Normandy

  • Classically Served With: Eggs, Fish, Steamed Poultry, Steamed Vegetables, Pastas, Veal

  • Technique and Recipe: How To Make Sauce Veloute and its Derivatives

  • Corresponding Podcast Episode: SCS 10| Sauce Veloute

Sauce Tomat (AKA Tomato Sauce)

  • Base: Tomatoes (Raw, Tomato Paste, Tomato Puree, Stewed Tomatoes)

  • Thickening Agent: Classically a Roux, modern versions commonly use a reduction or purees

  • Classical Flavorings: Salt Pork, Mirepoix, Garlic, White Veal Stock, Salt & Pepper, Sugar (Just enough to balance acidity, not enough to make the sweetness perceptible).

  • Common Secondary Sauces: Modern variations concentrate more on seasonings giving rise to sauces such as Creole, Portuguese and Spanish Sauce Tomat.

  • Classically Served With: Pasta, Fish, Vegetables (Especially Grilled), Polenta, Veal, Poultry (Especially Chicken), Breads and Dumplings such as Gnocchi.

  • Technique and Recipe: How to Make Tomato Sauce and Its Modern Variations

  • Corresponding Podcast Episode: SCS Episode 12| Sauce Tomat

Sauce Espagnole (AKA Sauce Brune or Brown Sauce)
 

Hollandaise Sauce
 

Watch the Video Lecture: The Five French Mother Sauces | An Introduction

Understanding The Five French Mother Sauces - Video Lecture

The Science Behind Brining

With Turkey Day quickly approaching, there has been a lot of talk on the web about whether or not you should brine your bird. Although there are good arguments from both camps, I think it is first important that the science of brining is understood before making any decisions.

A traditional brine is a water based liquid that contains between 3-6% salt by weight. Along with salt, a brine will contain aromatic herbs, spices and sometimes vegetables (usually mirepoix, garlic, etc).

So Why Would You Brine Meat?

Brining has two distinct effects on muscle tissue.

First, the high salinity of the brine “disrupts the structure of the muscle filaments” (On Food and Cooking, Pg 155). At about 3% salinity, the brine will partially dissolve “the protein structure” which supports the muscle filaments that contract when cooked. The more these muscles filaments are allowed to contract, the tougher your meat will be.

At about 5.5% salinity, the muscle filaments themselves are partially dissolved. Since their contracting ability is hindered by the salt, the muscle filaments contract less, effectively making your meat more tender.

Second, they way in which salt interacts with protein, allows the protein to retain more moisture, which is absorbed from the liquid of the brine itself. According to Harold McGee’s on Food and Cooking:

The meat’s weight increases by 10% or more. When cooked, the meat still loses around 20% of its weight in moisture, but this loss is counterbalanced by the brine absorbed, so the moisture loss is effectively cut in half. (PG 156)

This is what allows brined meat to stay more moist, compared to its unbrined counterpart.

The reason why a lot of people prefer to brine their turkey for the big day is because turkey breasts are finished cooking at around 145 degrees F, and start to dry out at around 155 F. The legs on the other hand need to be cooked to about 165 degrees F, because they have a much higher amount of connective tissue (in the form of collagen), and collagen doesn’t begin to break down until about 160 degrees F.

So by the time the turkey legs are done, the breasts are overcooked and dried out.

The problem with brining a turkey is the drippings contain much more water, and are too salty to make a proper pan gravy. Harrold McGee actually doesn’t brine his Thanksgiving Bird, and he explains why in his New York Times Article “Miracle Cure or Just Salt Water?

Also, check out this Stella Forum Thread on Brining.

How To Make Sauce Espagnole

Sauce Epsagnole is one of the Five French Mother Sauces, and is the classical precursor to modern day sauces such as Demi-Glace. It goes great with any sort of roasted red meat, and is the base for many popular classic French Sauces including Sauce Robert and Sauce Bordelaise, (see below).

Before we get into how to make Sauce Espagnole, first, a little clarification about Demi-Glace.

Classical demi glace is one part Brown Sauce (Espagnole) and one part Brown Stock (Such as Roasted Veal Stock), combined in a pot and reduced by half. However, modern day menus that list a “Demi-Glace” as their sauce are usually referring to a stock that has been reduced by at least half, or until it coats the back of a spoon. The gelatin contained in the stock itself is what thickens the sauce. No other thickening agent such as roux is used.

Modern chefs prefer “full reduction” sauces over a classical demi-glace because they have a much more intense flavor, and the classical thickening agent of a roux makes the sauce heavy and effects its taste.

Recipe For Classical Sauce Espagnole (Brown Sauce)

  • Mirepoix: 4 oz/112g onions, 2 oz/56g celery, 2 oz/56g carrots
  • 2 oz/56g butter
  • 2  oz/56g flour
  • 2 oz/56g Tomato Puree
  • Sachet Containing: 1/2 Bay Leaf, 2-3 Sprigs of Fresh Thyme, 2-3 Sprigs Parsley
  • 1.5-2 qts/1.5-2L  Roasted Veal Stock
  1. Start by roasting your mirepoix over medium heat, in the bottom of a heavy bottom sauce pot with the butter, until the mirepoix turns a nice golden brown.
  2. Once your mirepoix has browned, add in your tomato puree and continue roasting for 2-3 more minutes.
  3. Sprinkle in your flour, and cook until the flour is well incorporated into the other ingredients (about 5 more minutes).
  4. Add your roasted veal stock and sachet.
  5. Bring to a simmer, and gently simmer for about 2 hours, reducing the entire sauce down to 1qt/L. If necessary, add more stock if too much evaporates during the cooking process. Skim sauce as needed.
  6. Tip: While simmering your sauce, pull it half way off the burner, so that all the scum will collect on one side of the pot, making it easier to skim.
  7. Once your sauce is finished cooking, pass it through a fine chinois a couple of times to insure a smooth, consistent texture.

Secondary Sauces (Derivatives) Made From Espagnole

Classical Demi-Glace

  • Combine Sauce Espagnole and Roasted Veal Stock at the Ratio of 1:1, and reduce by half.
  • Strain through a fine mesh strainer (chinois).

Sauce Bordelaise

To yield 1 qt/L combine in a sauce pan:

  • 1 cup/236ml red wine
  • 2 oz/56g chopped shallots
  • Fresh cracked black pepper to taste
  • 2-3 sprigs fresh thyme
  • 1/2 a bay leaf

Reduce these ingredients by half, and then stir in 1 qt of demi-glace (see above) and simmer for about 15-20 minutes. Strain through a chinois and then finish by swirling in 2 oz of raw butter. Sauce Bordelaise was traditionally garnished with diced bone marrow that had been poached in salted water.

Sauce Robert

To yield 1 qt/L:

  • Sweat 4oz/112g of diced white onion with some butter over medium low heat for 5-10 minutes, or until soft and tender.
  • Deglaze with 1 cup/236ml of dry white wine, and reduce by two-thirds.
  • Add in 1 qt/L of demi glace and simmer for about 10-15 minutes.
  • Strain sauce through a chinois and finish with 2 teaspoons of dry mustard, a pinch of sugar, and squeeze in the juice of half a lemon.
  • Check seasoning for salt and pepper.

Further Information
 

How To Make Sauce Tomat

Sauce Tomat, better known as tomato sauce, is a French Mother Sauce based on tomatoes. This base can consist of fresh tomatoes cooked down into a liquid, canned tomatoes, tomato puree or even tomato paste.

“Hey, wait a second now, how is tomato sauce a French Mother sauce when it’s clearly Italian?”

Well, you do know it was the Italians that taught the French  to cook right? But that’s a whole other post. Suffice it to say that just like all the other mother sauces, “Sauce Tomat” is an incredibly versatile base sauce that can have any number of variations.

But before we start playing around with tomato sauce, it is important to first understand the classic version. My favorite classical recipe for Sauce Tomat is Escoffier’s version.

Escoffier’s Sauce Tomat Recipe

Although most of the sauce recipes that I’ve been giving for the Mother Sauces yield 1 quart (1 liter), this recipe will yield 2 quarts since you can almost never have enough tomato sauce, and it is always better the next day anyway. For Escoffier’s recipe you will need:

  • 2-3 oz (56-84 g) Salt Pork. Salt pork comes from the belly portion of the pig, just like bacon. However, unlike bacon, salt pork is never smoked, and the fattier (more white), the better.
  • 3 oz (84 g) Carrots, peeled and medium diced
  • 3 oz (84 g) White or Yellow onion, medium diced
  • 2 oz (56 g) whole butter
  • 2-3 oz (56-84 g) Flour, All Purpose
  • 5 lbs (2.25 Kilos) Raw, Good quality tomatoes, quartered
  • 1 qt (1 lt) White Veal Stock
  • 1 clove freshly crushed garlic
  • Salt and Pepper To taste
  • Pinch of Sugar
  1. In his book, Escoffier calls for you to “fry the salt pork in the butter until the pork is nearly melted.” The term frying can be misleading, and what he’s really calling for you to do is to render the fat.
  2. To render out the salt pork properly, place the salt pork in a heavy bottom saucepan with a tablespoon of water, cover with a lid, and place over medium heat. Check in about 5 minutes. The steam from the water will allow the fat to render out of the salt pork before it starts to brown or burn.
  3. After the salt pork is nice and rendered out, add in your butter, carrots and onions, and sweat over medium heat for about 5-10 minutes, or until they become nice and tender and start to release their aromatic aromas.
  4. Sprinkle the flour over the carrots and onions and continue to cook for another few minutes. You’re essentially using the residual fat from the butter and salt pork to make a blond roux.
  5. Add in your raw tomatoes.  Roast with other ingredients until they start to soften and release some of their liquid.
  6. Add in your white veal stock and a clove of crushed garlic.
  7. Cover the pot with a lid, and Escoffier says to put it in a moderate oven, which is about 350 degrees F or 175 C. If your sauce pot won’t fit, you can always just simmer it on your stove top. Bake in oven or simmer for 1.5-2 hours.
  8. Escoffier’s classical recipe also calls for you to pass your finished sauce through a Tamis, but if you’re looking for a smooth tomato sauce, I would instead recommend that you first blend it in a blender, and then press it through a chinois.
  9. Once you have passed your sauce through the chinois, finish by seasoning it with salt, pepper, and a pinch of sugar.
  10. Note on Sugar: The addition of sugar is used to balance the natural acidity of the tomatoes. Your tomato sauce should not taste sweet, unless you enjoy putting ketchup on your pasta.

Modern Variations on Escoffier’s Sauce Tomat

The major difference between Escoffier’s version of sauce tomat and modern variations that are taught in culinary school are two fold. (1), The Roux is omitted and instead of using fresh tomatoes, canned tomatoes and tomato puree are used in the respective ratio of 2:1 and, (2) Instead of using white veal stock, modern recipes call for the simmering of a roasted ham bone.

Other than that, the process is pretty much the same as discussed above. Follow the same recipe and process, except use 3lbs of canned tomatoes and 2lbs of tomato puree instead of the 5lbs of fresh tomatoes. Simmer for two hours with the addition of a roasted ham bone and omit the veal stock since the tomato puree and canned tomatoes offer plenty liquid for simmering the sauce.

Another modern touch is the common use of aromatic fresh herbs including bay leaves, thyme, basil and oregano. Add these at your own discretion, at the end of the cooking process so that the flavor of the fresh herbs does not break down.

Basic Light Tomato Sauce

If you’re looking for a lighter version of tomato sauce to serve with a more delicate dish such as poached fish, use the ratios and procedure below.

  • 1 part mirepoix, (Onions, Carrot and Celery, at a 2:1:1 Ratio), small dice
  • 4-5 parts fresh or canned tomatoes
  • Fresh Chopped Garlic and Herbs To Taste
  • Olive Oil
  • Salt and Pepper To Taste
  • Butter and Heavy Cream to finish (Optional)
  1. Start by sweating your mirepoix over medium heat in a sauce pan with a little bit of olive oil.
  2. Once the mirepoix becomes nice and soft, and starts to release its sweet aroma (about 5-10 minutes) add in your tomatoes and fresh chopped garlic.
  3. Simmer for 1.5-2 hours. Season with salt, pepper, and a pinch of sugar. Add fresh herbs to taste.
  4. At this point, if you desire a smooth texture, you can blend your sauce and then pass it through a chinois.
  5. Finish with swirling in some heavy cream and whole butter off the flame. This is optional, but if you’re not averse to butter and cream, it will add a nice flavor and mouth feel.

Further Information

Thickening Agents For Sauces And Soups Reviewed

  1. Roux – Equal parts flour to fat (clarified butter is traditional). There are three different stages for rouxs including white, blond and brown. Full thickening power is not realized until sauce or soup is brought up to a simmer after the roux is incorporated. For ratios and more detailed guidelines, check out this post on how to make and use a roux.

  2. Liason – A mixture of heavy cream and eggs, added just at the end of the cooking process to slightly thicken, but mostly enrich, sauces and soups. The standard ratio for a liaison is 16:1:2. So for every 16 ounces (or one pint) of sauce, you will need 1 egg yolk and 2 ounces of cream. The liaison will be tempered with up to 1/3 of the warm sauce or soup before incorporated. This helps to keep the eggs from coagulating. For more information, check out this post on how to make and use a liaison.

  3. White Wash – A mixture of water and flour is whisked together into a “slurry” before being incorporated into a sauce. The water helps to hydrate the starch molecules in the flour, preventing the flour from clumping when it hits the hot sauce or soup. This is an extremely poor technique to use. It is only listed here for sake of completeness.

  4. Beurre Manie – Also known as “The Lazy Chef’s Roux,” Beurre Manie is equal parts of flour and whole butter kneaded together until it forms something like a dough. Pieces of this dough are then broken apart and added to simmering sauces or soups to thicken them. It is recommend that you simmer the sauce for at least 20 minutes more to cook out any raw, starchy flavor the flour introduces. Use the same ratios of Beurre Manie that you would a Roux.

  5. Corn Starch – Has twice the thickening power of flour. Most commonly added to a soup or sauce in a slurry form, using a 1:1 mixture of water to Corn Starch. To thicken a sauce or soup with the consistency of water to a traditional nape stage (coats the back of a spoon), you will need 2 oz of Corn Starch for every 1 qt of sauce or soup. Full thickening power will not be realized until your sauce begins to simmer. Corn Starch has tendency to give sauces a smooth and shinny appearance. It is used extensively in Asian cooking, especially Chinese Cuisine.

  6. Arrow Root- Very similar to Corn Starch with the same thickening power. It is used exactly in the same fashion as Corn Starch to thicken sauces and soups. Has a much more neutral taste than Corn Starch, but tends to be more expensive. Most commonly added as a slurry, and its full thickening power is not realized until the sauce is brought to a simmer.

  7. Farine – Literally the French word for “flour”. As a thickening technique it refers to dusting your product (usually a protein) in flour. The excess flour is then shaken off, and the product is sauté d. The pan is then usually de-glazed, and a sauce is built on top of this base. Also commonly used to build a base for thick soups and stews.

  8. Panade – Most commonly used to stabilize and bind meat balls and pâtés, it is usually a mixture of day old bread and some sort of liquid; stock, milk, water, etc. In the case of thickening sauces or soups, the bread is usually browned in butter and then simmered into the base that you wish to thicken. It can either be left as is, or blended and strained for a more refined consistency.

  9. Food Grade Gums – Food grade gums are really emerging as the thickening agent of choice in a lot of high end kitchens. They’re gaining popularity because they are extremely neutral in flavor and are added in such low concentrations (usually les than 0.5% by weight), that they have no effect on color or flavor. One of the most commonly used food grade gums for this purpose is Xanthan Gum, which can be picked up at a lot of health foods stores.

How To Make Mayonnaise, Aioli and Their Derivatives

UPDATE: You can find our instructional video on how to make mayonnaise here.

Like many of the mother sauces, a well made mayonnaise is the base to an endless possibility of cold, emulsified sauces. Although now days there are many good quality commercial mayonnaise available, understanding how to make a mayonnaise is basic knowledge that every cook or chef should have. Not to mention, that with the selection and use of high quality products, fresh made mayonnaise can have a far superior flavor to that of its commercial counterparts.

Some Guidelines for Making Mayonnaise

  • Use a blender, food processor or a stand-top mixer with a whisk attachment. Not only will it ensure that your arm doesn’t fall off from hand whisking, but the shearing power of these devices is capable of breaking the oil into much smaller droplets, making a more stable emulsion.

  • Have both your egg yolks and oil at room temperature before starting. It will make the emulsification process much easier.

  • Use the freshest eggs possible, preferably organic from a farmer’s market. If cooking for children or the elderly, pasteurized egg yolks are always recommended.

Standard Ratio for Mayonnaise

At it’s most basic level, mayonnaise is simply a neutral oil emulsified into egg yolks. The ratio for a basic mayonnaise is:

  • 1 yolk per 1 cup of neutral oil (canola, safflower, grape seed).

Although many classical recipes call for the addition of other ingredients, egg yolks and oil are all you need to make a mayonnaise. Some additional ingredients that are used to season mayonnaise are:

  • Vinegar

  • Salt

  • Pepper (usually white)

  • Dry Mustard

  • Cayenne Pepper

  • Lemon Juice

Standard Recipe For 2 Cups of Mayonnaise

  1. 2 egg yolks

  2. 1/2 table spoon of vinegar

  3. 1/2 teaspoon salt

  4. 1/2 teaspoon dry mustard

  5. Small Pinch cayenne

  6. 2 cups Salad Oil (canola preferred)

  7. 1 Tablespoon Vinegar

  8. 1-2 Tablespoons Lemon Juice

  • Put ingredients 1-5 into a blender, food processor or KitchenAid with a whisk attachment and mix well.

  • Very slowly at first, start streaming in your oil, a little at a time until your emulsification starts to form.

  • Use the 1 tablespoon of vinegar to thin the mayonnaise if it starts to become too thick before the emulsification is complete.

  • Once all the oil is incorporated into egg yolks and the mayonnaise is finished, it should be thick enough to be turned upside down without the mayonnaise coming out of the mixing container.

  • Adjust the final seasoning with the lemon juice, salt and pepper (white, cayenne or black pepper depending on preference).

What’s The Difference Between Mayonnaise and Aioli

A common question asked is what’s the difference between mayonnaise and aioli. Now days, the term aioli has been bastardized by some chefs to be synonymous with any flavored mayonnaise. However, there is an exacting classical distinction between mayonnaise and aioli.

The difference between mayonnaise and aioli is the simple fact that aioli is made with extra virgin olive oil and has the addition of crushed garlic. So to make aioli, follow the standard recipe above, but instead, substitute the canola oil for extra virgin olive oil and add 1 tablespoon of fresh minced garlic to the egg yolks during the blending/beating process.

The simplified ratio for Aioli is:

  • 1 egg yolk + 1 cup extra virgin olive oil + 1 teaspoon of crushed garlic = Aioli.

  • This ratio can be seasoned with lemon juice, salt and pepper to yield a simple and traditional Aioli.

Mayonnaise Based Sauces

As stated before, mayonnaise is a great base to use for making other unique sauces. One of my all time favorite cook books “Charcuterie” by Michael Rhulman and Brian Polcyn, makes these suggestions:

  • For Pork try adding some cumin, cayenne and lime juice.

  • For Fish add saffron and garlic.

  • For Chicken add lemon juice and tarragon.

  • For Beef add a little fresh horse radish (I would also recommend some fresh chopped chives).

Another very traditional mayonnaise based sauce is Remoulade which is traditionally served with fish. To make a traditional remoulade you will need:

  • 2 Cups of Mayonnaise

  • About 1 tablespoon of good Dijon

  • 1/4 cup finely chopped cornichons (Tiny, French, Sweet Pickles)

  • Tablespoon chopped capers

  • 1 anchovy fillet, finely chopped

  • 3 tablespoons chopped parsey

  • 1 teaspoon chopped fresh chervil

  • 1 teaspoon chopped fresh tarragon

Mix all ingredients together and serve with fish. This is a great dipping sauce for fish and chips!

To make other mayonnaise based sauces, start with 2 cups of freshly made or neutral store bought mayonnaise and add:

  • Thousand Island Dressing: 1/2 cup chili sauce, 1/2 ounce minced onion, 1 ounce finely chopped green pepper, 1 ounce drained pimiento.

  • Louis Dressing: same as Thousand Island with the addition of 1/2 cup heavy cream.

  • Russian Dressing: 1/2 cup chili sauce or catsup, 1 ounce fresh horseradish, 1.2 ounce minced onion.

  • Chantilly: 1/2 cup of heavy creamed whipped until a stiff peak and added in just before service.

  • Blue Cheese Dressing: substitute one cup of mayonnaise for one cup of sour cream (optional but really good), add 1 ounce white vinegar, /2 teaspoon Worcestershire sauce, 4 ounces crumbled bleu cheese; thin with 1-2 cups heavy cream, half and half or buttermilk.

  • Ranch Dressing: 1 1/2 cups sour cream, 1/2 cup buttermilk, 2 ounces wine vinegar of your choice, 1/2 ounce lemon juice, 1/2 ounce Worcestershire sauce, 2 Tablespoons chopped parsley, 1 tablespoon chopped chives, 1-2 crushed garlic cloves, 1 scallion (green onion) finely chopped, 2 teaspoons celery seed.

How To Make Sauce Veloute and Its Derivatives

Sauce Veloute is a very simple member of the Five French Mother Sauces that is used for a base to make many different secondary sauces and leading sauces.
 

Standard Ratio and Recipe for Sauce Veloute

  • 4 ounce blond roux (2 ounces clarified butter and 2 ounces all purpose flour)
  • 1 1/4 quarts hot, White Stock (Veal, Chicken, or Fish)
  1. Heat up your white stock in a heavy bottom sauce pan.
  2. In a separate pan, cook roux to a blond stage.
  3. Allow roux to cool slightly before adding it to the gently simmering stock.
  4. Whisk stock and roux together and bring to a gentle simmer.
  5. Allow to simmer for about 45 minutes to 1 hour.
  6. Adjust consistency by adding more hot stock if necessary. Recipe should yield 1 qt of sauce at the “napé” stage, meaning the sauce should thinly coat the back of a spoon.
  7. Finish by straining through a chinois or a strainer lined with cheesecloth.
  8. Note: Do not season your Veloute. Veloute is always used as a foundation for other secondary sauces and small sauces, at which time you will season the sauce as a whole.

Now that you have the basic recipe for sauce Veloute, lets look at some of its secondary and small sauces.
 

Sauce Vin Blanc (White Wine Sauce)
 

Sauce Vin Blanc is a variation of secondary sauce based on fish Veloute. Not surprisingly, the White Wine Sauce goes great with just about any type of fish or seafood dish.

  • 4 oz dry white wine
  • 1 quart fish Veloute
  • 4 oz heavy cream
  • 1 oz butter
  • Salt, White Pepper and Lemon Juice to taste.
  1. Reduce your white wine by half and then add your fish Veloute.
  2. Reduce your Veloute until it coats the back of a spoon. This consistency is referd to as “napé.”
  3. Temper cream and stir into the Veloute.
  4. Right before serving, swirl in you butter and season with salt, white pepper and a couple drops of lemon juice.
  5. Strain through a chinois and serve.

Sauce Supreme
 

Sauce supreme is a very simple variation based on Chicken Veloute. Since this sauce is so simple, it’s very important to make sure that your chicken stock is made properly and of high quality. Use heavy whipping cream and European butter if you can find them. This sauce is traditionally served with poached or steam chicken, or any other type of poultry dish with delicate flavors.

  • 1 qt chicken Veloute
  • 1 cup heavy cream, warm
  • 1 oz butter
  • Salt, White Pepper and Lemon Juice to taste.
  1. Reduce Chicken Veloute by 1/4.
  2. Add in warm, heavy cream.
  3. Swirl in butter
  4. Season with salt, white pepper and lemon juice to taste.
  5. Strain through a chinois and serve.

Sauce Allemande
 

Sauce Allemande is another simple sauce based on Veal Veloute. But with the richness of the Liason and the brightness of the fresh lemon juice, this sauce is simply amazing. This is a perfect sauce for Veal Scallopini.

  • 1 qt of Veal Veloute
  • 2 egg yolks (for liaison)
  • 4 ounce heavy cream (for liaison)
  • 1 tablespoon lemon juice
  • White Pepper and Salt to taste

Small Sauces Based on Veloute
 

Although you can use Veloute as a base to make your own, uniquely flavored sauces, there are some traditional “small sauces” that use Veloute as its base.
 

Sauce Poulette

  • Simmer 8 ounces of white, button mushrooms with when making 1 quart of Veloute of your choice.
  • Use Veloute to make Sauce Allemande and then strain out mushrooms.
  • Finish with 2 tablespoons of chopped parsley and lemon juice to taste.

Sauce Bercy

  • Reduce by two-thirds: 2 ounces chopped shallots and 1/2 cup white wine.
  • Add 1 quart Fish Veloute and simmer for about 10-15 minutes, reducing slightly.
  • Turn of heat and finish sauce by swirling in 2 ounces raw butter.
  • Season with chopped parsley and lemon juice to taste.

Sauce Normandy

  • Bring 1 quart of Fish Veloute to a simmer.
  • Add 4 ounces of mushrooms and 4 ounces of oyster liquid or fish fumet.
  • Reduce by 1/3.
  • Finish with a liaison of 4 egg yolks and 1 cup heavy cream.
  • Strain and swirl in 3 ounces of raw butter off the heat.

Further Information

How To Make Hollandaise | A French Mother Sauce

Hollandaise is by far the most finicky of all the French Mother Sauces. Numerous things can go wrong when making this sauce; whether your emulsification breaks, the eggs start to curdle, etc. Many cooks allow this sauce to frighten and intimidate them. However, if you understand the underlying principles of hollandaise, then it really isn’t that scary.
 

First and foremost, hollandaise is an emulsified sauce in which egg yolks not only serve as the emulsifier, but also as a thickening agent. The final viscosity of your sauce will be determined by how much fat is emulsified in and to what degree the egg yolks are cooked. The more you cook the egg yolks, the thicker your hollandaise will be. However, the more you cook your egg yolks, the more chance you have of ending up with scrambled eggs instead of sauce.
 

To prevent their eggs from scrambling, a lot of less experienced cooks will heat their egg yolks in a stainless steel bowl placed over a pot of gently simmering water (aka double boiler). The gentle heat of the steam is much more forgiving than a direct flame. With that said, lets go over a couple guidelines.
 

Guidelines for Making Hollandaise
 

  • Eggs start to curdle at around 160-170°F/71-76°C. The trick is to heat your egg yolks enough to get them thick, but stop right before they reach this temperature.
  • Acid (usually in the form of lemon juice and/or vinegar) will help to keep your egg yolks from coagulating. If the PH in you egg mixture is around 4.5, then the curdling temperature of the yolks is raised to about 195°F/90°C. This is why most classical version of hollandaise call for the addition of a vinegar reduction to be cooked with the yolks.
  • When making hollandaise, some chefs use whole butter while others use clarified. Although it really comes down to personal preference, just remember that whole butter is about 15% water whereas clarified butter is straight butter fat. Because of its water content, more whole butter is needed to thicken a hollandaise then just straight clarified butter.
  • Make sure your acid reduction is cool before the egg yolks are added or they may curdle.
  • The fresher your egg yolks, the easier it is for you to make your emulsion.
  • Use a stainless steel, round bottom bowl. The round bottom will make it easier for you to beat the egg yolks evenly and the stainless steel will not react to the acid and discolor your hollandaise.
  • When adding your butter to the egg yolks, make sure that it is warm (about 130°F/55°C) but not hot. If your clarified butter is too hot it will instantly curdle your egg yolks.
  • Whenever making any type of emulsion, always add the fat or oil slowly at first, a couple drops at a time. Hollandaise is no different. If you add the butter too fast, then it will give the fat a chance to “coalesce,” which will cause your sauce to separate.
  • Another common reason why hollandaise will break is the addition of too much fat. The standard ratio is 6 egg yolks to 1lb of clarified butter.
  • If concerned about the consumption of raw egg yolks, heat yolks to at least 165°F/74°C or use pasteurized egg yolks to make your hollandaise.

Classical Hollandaise Recipe
 

To make 2 cups of hollandaise, you will need:

  • 1 1/4 lbs of butter, clarified (you should end up with about 1 lb of clarified butter)
  • 1/8 teaspoon Peppercorns, crushed
  • 1/8 teaspoon Salt, (kosher preferred)
  • 1.5 oz White Wine Vinegar
  • 1 oz cold water
  • 6 Egg Yolks
  • 1-2 tablespoons of lemon juice
  • Salt and Cayenne Pepper to taste

Hollandaise Procedure
 

  • Clarify your butter.
  • Place salt, vinegar and crushed peppercorns into a sauce pan and reduce by 2/3. Remove from heat and add water.
  • Transfer reduction to a stainless-steel mixing bowl.
  • Add egg yolks and beat over a simmering pot of water until the egg yolks become thick and creamy. (If unsure about the thickness, monitor with an instant read thermometer and make sure the eggs do not exceed 150°F/65°C).
  • Once the egg yolks have reached the desired thickness, remove from heat. Using a ladle, slowly drizzle in the warm clarified butter, starting with just a few droplets first to get the emulsion going.
  • Continue streaming in the clarified butter until it is completely incorporated. If the hollandaise becomes to thick before all the butter is emulsified in, thin the hollandaise with a couple drops of warm water.
  • Finish by seasoning your hollandaise with salt, lemon juice and cayenne pepper to taste. Add just enough cayenne to help cut through the fat of the hollandaise and to add depth of flavor; your hollandaise should not be spicy.
  • Adjust final consistency with a little bit of warm water to both lighten the sauce and give it better flow.
  • Keep warm over a double boiler (ban-marie) until ready to serve. The best holding temperature is about 145°F/63°C. This temperature both discourages the growth of bacteria and is hot enough to keep the fat in your hollandaise from solidifying. For both food safety and quality control, hollandaise should not be held any longer than two hours.

How to Fix a Broken or Curdled Hollandaise
 

If your hollandaise breaks or curdles, it’s not the end of the world. Simply follow the steps below to salvage your sauce.
 

  • Pass through a chinois to strain out any curdled portions of the hollandaise.
  • Make sure to keep the whole strained portion of the sauce warm.
  • Add 1 yolk plus 1 tablespoon of warm water to a new stainless-steel mixing bowl and whisk in your strained hollandaise.
  • Congratulations, hollandaise saved!

Further Information

How To Make and Use a Liaison

A liaison is a mixture of egg yolks and cream that is used to finish some classical French sauces. Although a liaison will slightly thicken a sauce, it’s biggest contribution is richness and mouth feel.

When using a liaison it is important to understand that pure egg yolks will curdle around 140-150 F and about 60-70 C. When you mix the egg yolks with cream, it raises the curdling temperature to around 180-185 F and about 83 C.
 

Standard Ratio for Liaison

The standard ratio for a liaison is 16 x 1 x 2. So for every 16 ounces (or one pint) of sauce, you will need 1 egg yolk and 2 ounces of cream.
 

Incorporating a Liaison Into a Sauce

To incorporate a liaison into a sauce, first beat your egg yolks and heavy cream together in a separate bowl. Heat your sauce to about 180 degrees F or 80 degrees C, which is just below the simmering point. If you allow your sauce to simmer or boil, it will curdle your eggs.
 

Now slowly add some of your hot sauce to your cream and yolk mixture, whisking constantly. Once you have added about 1/3 of your total sauce to your liaison, add the entire mixture back into your original sauce.

Heat the sauce to about 180 F (80 C) and strain through a fine chinois before serving.

For more information on how to make and use a liaison, listen to SCS 9| Sauce Hollandaise. Or you can check out our Complete Guide to the Five French Mother Sauces.

Some Quick and Dirty Tips For Deep Frying

Although most people are pretty familiar with the process of deep frying, here are some tips to make it a little easier, allowing you to end up with a better finished product.

  • Although deep frying is an incredibly versatile technique, it is used mainly for poultry and chicken because it keeps these products from drying out while allowing them to achieve a nice, crispy exterior.
  • Cooking temperatures range from 300 to 400 degrees Fahrenheit. Use a lower frying temperature for items that take a little longer to cook such as frying chicken at 325 degrees. Also, potato chips are usually fried at about 300-310 degrees F to allow enough time for all the water to be fried out of them before they become burnt.
  • Fast food joints use special pressure cookers that raise the internal boiling temperature of water to 250 degrees F (which is usually 212 degrees F at sea level). The higher boiling point allows the food to cook without as much moisture loss, ultimately resulting in a juicier finished product.
  • When frying fish, first salt with a little bit of kosher salt and then dredge in flour. The salt will bring a protein rich fluid to the surface of the fish which will allow for better adhesion to the flour. The flour will give the fish a nice protective coating, keeping the flesh from becoming fibrous and chewy. It will also allow for even and thorough browning.
  • When making batters for deep frying, use a flour that has a lower gluten content such as cake flour. Too much gluten can produce a tough, bready coating. However, gluten also aids the clingy properties of your batter so you don’t want your flour to be completely gluten free.
  • When using all purpose flour (AP) for batters, the addition of cornstarch and corn meal can be added to the lessen the negative effects of gluten in the flour.
  • When breading items with bread crumbs, first dredge the product in flour, then dip in egg, and then coat with bread crumbs. The flour will allow for the adhesion of the egg, and the egg will allow for the easy adhesion of the bread crumbs. Panko bread crumbs are a favorite among chefs.

For more information on proper frying technique, listen to SCS 8| Frying, Confit & Deep Fat Poaching.

Pages