In it’s most basic form, braising consists of a tough cut of meat with a lot of connective tissue, combined with liquid, aromatic vegetables and fresh herbs; this mixture is then cooked in a low oven until they becomes tender. The connective tissue responsible for the chewy texture is collagen, which is a triple helix of gelatin. When moisture along with slow, steady heat are applied, the triple helix unravels into three individual gelatin strands, leaving gaps in the muscle tissue it used to bind together, giving the impression of tenderness.
Yet for the collagen to break down, the meat must reach an internal temperature of at least 155˚F/68˚C. This is well above the internal temperature of a medium steak (140˚F/60˚C), and well into the range in which protein fibers fully contract and coagulate, expelling most of their liquid, causing a dry texture and lack of flavor.
Enter the cold start and low temperature braise, in which the short ribs are placed in a cold oven, and braised at 200˚F/121˚C. As the short ribs slowly come up to temperature, they spend an extended period of time between 120-130˚F/48-54˚C, a temperature at which the same enzymes responsible for dry aged beef’s flavor and tenderness are hyper-activated.
Using the cold start approach means your short ribs will have more flavor, a superior tenderness, and most important, will require less time for the collagen to break down at protein-fiber-drying temperatures (155˚F/68˚C). Less time at this temperature means more juices are retained, which further enhances the short rib’s flavor and texture.
The Pre Braise Stage
Before braising, the short ribs are seasoned with salt and freshly ground black pepper, seared in a screaming hot pan with plenty of oil, browned on all sides, and then set aside. Searing as I’m sure you’re aware has nothing to do with “locking in the juices,” but it simply creates more flavor through the maillard reaction in which proteins brown, form new compounds, and create those delicious flavors and aromas associated with roasted meats and vegetables. This is why it’s important to generate a dark golden brown color on all sides of your short ribs; more brown surfaces equals more flavor.
 Some chef’s prefer to dust their short ribs in flour first before browning. But notice how I swapped the word “searing” for “browning” since flour will quickly scorch at high temperatures. Dusting the short ribs in flour achieves two goals. One, when cooked to a dark, golden brown color, the flour will add flavors and aromas reminiscent of toasted nuts and bread. And two, the flour will help slightly thicken the sauce during the reduction phase, just like a roux.
After the short ribs are browned on all sides, remove them from the pan, and immediately add thinly chopped aromatics.
In this particular recipe, I went with traditional mirepoix (carrot, celery and onions), along with ginger, garlic and leaks. The addition of thyme and parsley are always prudent (which I used), as is bay leaf, which wasn’t added, mainly because I didn’t feel like taking an extra trip to the store. But these aromatics can be swapped to fit any flavor profile you want. This dish could just as easily be at home in a Chinese, Japanese, Indian, or Italian kitchen, simply by swapping out a few aromatics and seasonings.
The aromatics are cut small for the same reason we brown the short ribs on all sides: surface area equals better flavor extraction. Once browned, place the aromatics at the bottom of a braising pan (this prevents the meat from coming into contact with the metal and scorching), add in any other spices and seasonings along with the seared short ribs, and cover with a liquid.
In this video I’m using veal stock for my braising liquid, but a well made chicken stock will also work. The only caveat is, your stock has to be home made (or bribed from a local chef) because the store bought stuff, while sometimes convenient, doesn’t contain enough gelatin to thicken into a glaze when reduced. No glaze equals sub par short short ribs, plus, this is a perfect opportunity for brushing up on your stock making skills.
The Braise Stage
Once the short ribs are combined in an appropriately sized braising vessel with aromatics and stock, seal the top of the container with a tight fitting lid or foil.
Place in a cold oven, and then set the temperature to 200˚F/93˚C for reasons previously discussed. Now forget about it for at least 4 hours.
Can you complete a braise in less time?
Sure. You can cook short ribs at 15 PSI in a pressure cooker for about 90 minutes with good results, but if you speed up the braising process by turning your oven temperature up, the short ribs won’t be as tender and flavorful as they could be.
After about 4 hours, check the ribs. If they’re done, a bone will easily wiggle away from the meat without much wrestling. If the bone doesn’t pull out clean, then put the short ribs back in the oven and try again in 30 minutes.
Depending on your oven and environment, this could take as long as 5-6 hours, but your patience will be rewarded. However, the cold start is the most important thing, due to its contribution to flavor and tenderness.
After the short ribs have been in the oven for at least 3 hours at a low temperature, if you’re starting to feel the threat of a possible kitchen mutiny staged by family members or guests who get especially irritable when hungry, feel free to turn the oven up to 350˚F/176˚C, at which point you should expect your short ribs to be done at the 3.5 to 4 hour mark.
The Glaze Stage
Once the short ribs are finished braising, pull from the container and allow to rest at room temperature. However, for best results, make the short ribs 1-3 days in advanced, and allow them to rest in their own liquid before moving on to this stage. 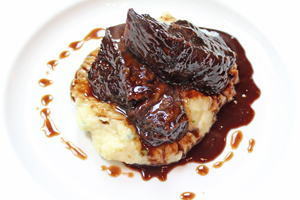
If making this in advanced, simply store in your fridge until you’re ready to reheat and serve. Reheat over low flame until the liquid is pourable (since it’s most likely set due to collagen that is now gelatin), and remove the short ribs from the liquid.
Strain braising liquid through a colander to remove large chunks of aromatics, and then again through a fine mesh strainer to remove any fine particles which will cause you sauce to have a gritty mouth feel.
Bring liquid to a boil over high heat, and then reduce to a simmer, moving the pot halfway off the burner so all the fat will collect on one side. Skim fat vigilantly throughout the reduction process; this is the key to having a flavorful glaze that isn’t greasy.
When reduced by 3/4s its original volume, transfer liquid to a large sauté pan and continue to reduce until a light glaze is formed. Place the short ribs back into the glaze, continuing to reduce, until the glaze easily clings to the meat, and the short ribs are heated through.
Remove from heat and serve with something tasty like glazed root vegetables or classic mashed potatoes (see links below).
Related Resources
There are 70 Comments

@ Wartface, So first, since
@ Wartface,
So first, since you have a pressure cooker, I would highly recommend making your own chicken stock. Just roast the bones and mirepoix as shown in this video, place in the pressure cooker, cover with water, and cook at 15 psi for 1.5 hours. You should be good to go.
Next, while you can cook the short ribs in a pressure cooker, you will have better control over the finished texture if you cook it low and slow in the oven.
Finally, if you're serving asparagus, simply peel and blanch, and then either roast in a very hot oven (or your Big Green Egg since I know you have one) until charred, or saute in a hot pan until charred. Toss with some good olive oil and sprinkle with sea salt and fresh cracked black pepper. A good, aged balsimic drizzle (like 20 year) is also a nice touch. Omit the hollandaise, since the reduced braising liquid will bring plenty of richness to the plate.
Let me know how it turns out, and take pictures if you can so we can see your final result.
I forgot to mention that if
I forgot to mention that if you're going to a wholesale store like Costco, you can buy a two pack of chicken, and practice your butchery skills by breaking down the whole chickens as shown here.
You can also airline the chicken breasts as shown here.
Freeze the breasts, and the leg and thighs, saving them for later; the resulting bones, neck, and wing tips can be used for making stock.
When it comes time to use the rest of your chicken, you can:
- Practice frenching a chicken leg and thigh, and stuff with forcemeat, and then cook it.
- Make chicken lollipops with the wings.
- Pan roast the chicken breast.
- Make a chicken roulade with the breast.
- Sous vide the chicken breast if you have a circulator
- And try out my world famous braised chicken thighs.
- Or you can debone the chicken legs, and make the "reconstructed chicken legs & thighs"
- And if you want to play more with sous vide and meat glue, you can also try your hand at my "reconstructed chicken breast."
So as you can see, this simple short rib project can send you down a rabbit hole of learning new culinary techniques!
@ Mogs, Great hints and tips
@ Mogs,
Great hints and tips - how does the skimming work out with a pressure cooker? Someone let me know :)
When using a pressure cooker, even though the temperature is higher than the boiling point, the liquid itself does not actually boil (yay science!). This means that when you open up your pressure cooker, all the fat released during the braising process will be sitting there on the top, just waiting for you.
Although you can skim straight away, I find it's easier to first remove the short ribs and then strain the stock into a tall, preferably clear container like a cambro. Give the liquid about 10-15 minutes for all the fat to rise to the top, and then skim.
You can also do this a day in advance, and let the strained braising liquid hang out in your fridge overnight. The next day the fat cap will be solidified, and you can just pull it right off.
Bring the braising liquid to a simmer, reduce, add short ribs to heat through and server. Make sure if the short ribs are at refrigeration temperature, you add them earlier on in the reducing process since they'll take longer to heat through. You can cover with a lid initially (for like 10 minutes) which will help to heat the short ribs more evenly.
@ Wartface,
Sounds good. Looking forward to you reporting back.
@ Wartface, Right on! Way to
@ Wartface,
Right on! Way to be a go getter. Looking forward to the results.
@ Mogs,
Oops, my mistake; but yeah, the principals stay the same. The stock is simply skimmed after it is pressure cooked and the results are great.
Right on Randy. I glad you
Right on Randy. I glad you took the technique and made it your own. The honey-crisp apple beer reduction sounds awesome!
Yes. Do a roasted chicken
Yes.
Do a roasted chicken stock, and then reinforce and reduce with more vegetables roasted vegetables and red wine if you have the time. I would recommend reducing by half.
It will come out great.
Hey Karlito, Good call on
Hey Karlito,
Good call on the tomato paste.
In the future, don't add any additional salt to the dish until after the reduction is complete. Taste the reduction, and if it still seems under seasoned (which it usually won't), you can add salt then.
Oxtail is absolutely delicious, but it takes much longer than short ribs. I usually slow braise in my oven overnight for 12 hours. Don't be put off by the bad result you had; I would encourage you to buy oxtail again and then slow braise in the oven overnight.
Awesome Randy! Please let me
Awesome Randy! Please let me know how it turns out.
Very nice! +200 Stella Stars.
Very nice! +200 Stella Stars.