Error message

  • Notice: Trying to access array offset on value of type int in element_children() (line 6435 of /home2/cheffrog/public_html/newsc/includes/common.inc).
  • Notice: Trying to access array offset on value of type int in element_children() (line 6435 of /home2/cheffrog/public_html/newsc/includes/common.inc).
  • Notice: Trying to access array offset on value of type int in element_children() (line 6435 of /home2/cheffrog/public_html/newsc/includes/common.inc).
  • Notice: Trying to access array offset on value of type int in element_children() (line 6435 of /home2/cheffrog/public_html/newsc/includes/common.inc).
  • Notice: Trying to access array offset on value of type int in element_children() (line 6435 of /home2/cheffrog/public_html/newsc/includes/common.inc).
  • Notice: Trying to access array offset on value of type int in element_children() (line 6435 of /home2/cheffrog/public_html/newsc/includes/common.inc).
  • Notice: Trying to access array offset on value of type int in element_children() (line 6435 of /home2/cheffrog/public_html/newsc/includes/common.inc).
  • Notice: Trying to access array offset on value of type int in element_children() (line 6435 of /home2/cheffrog/public_html/newsc/includes/common.inc).
  • Notice: Trying to access array offset on value of type int in element_children() (line 6435 of /home2/cheffrog/public_html/newsc/includes/common.inc).
  • Notice: Trying to access array offset on value of type int in element_children() (line 6435 of /home2/cheffrog/public_html/newsc/includes/common.inc).
  • Deprecated function: implode(): Passing glue string after array is deprecated. Swap the parameters in drupal_get_feeds() (line 394 of /home2/cheffrog/public_html/newsc/includes/common.inc).
  • Deprecated function: The each() function is deprecated. This message will be suppressed on further calls in menu_set_active_trail() (line 2394 of /home2/cheffrog/public_html/newsc/includes/menu.inc).

Latest Articles and Blog Posts

How To Render Duck Fat

In SCS Episode 8, one of the main techniques that we discussed was confit. One thing we discussed is that when making duck confit, true duck fat is always preferable. Not only does the fat give great flavor to your duck, but its also an extremely versatile cooking medium that can be used for slow poaching, sauté ing or even frying.

When butchering a whole duck, save all the skin trimmings especially the large pieces that are taken from the neck and the flaps of skin at the opening of the cavity. Don’t forget to trim all the skin off of the back of the duck.

If you’re not breaking down the whole duck, try and sweet talk a local butcher into saving the skin for you. If all this sounds like too much of a pain, you can simply buy good quality duck fat online. I've never done this so I can't recommend one company over another, but I'm sure you can do a quick Google or Amazon search.

  • Place all your duck skin trimmings in the bottom of an appropriate sized pot and add a couple tablespoons of water. The steam from the water will help the initial release of duck.
  • Place the pot on the lowest setting on your stove top and cover with a lid. Make sure you keep a small crack in the lid for the steam to escape so that it doesn’t condense back down into your duck fat.
  • Let the fat render out on the stove for about 2-3 hours depending on how low you have your flame. Be sure to give the fat a good stir with some tongs about every 1/2 hour.
  • Once the fat is rendered out, strain it through a strainer and allow to cool.
  • Once cooled, store the fat in an airtight, light resistant container in your refrigerator for up to 1 month or freeze for up to 6 months.
  • By the way, don’t throw that duck skin away after you have rendered out the fat. Instead, spread them out on a sheet pan and bake until they become golden brown and crispy.
  • These duck “cracklins” can be eaten like chips, chopped and tossed into a salad like bacon bits, or used to make cracklin’ corn bread. The possibilities are endless.

Further Information
 

How To Season A Cast Iron Pan

A well seasoned cast iron pan is one of the most jealously guarded tools in a kitchen. Back before teflon pans were invented, these were the original non-stick pans that people used to cook eggs and other delicate items. Also, nothing really gives you a better seared crust than a good cast iron skillet.

To Season Your Cast Iron Pan

  • Preheat your oven to 350 degrees F.

  • If the pan is new, scrub with soapy water and dry thoroughly.

  • Place a table spoon of vegetable shortening or vegetable oil in the center of the pan.

  • Place the pan in the oven and allow the shortening to melt.

  • Once the shortening melts, rub it all around the inside of the pan with a paper towel.

  • Place pan back in oven, upside down, and back for about an hour.

  • Turn off the oven and let the pan cool down inside.

  • Wipe off any excess fat with a clean paper towel and store.

  • To clean your cast iron pan, after you are done using it, add some kosher salt and a little oil and scrub. Do not use soap or water. Wipe clean with a paper towel.

Update: This article was written a while back and is a method that's worked for me in the past. Yet we live in an ever changing culinary landscape. As more research is done, new techniques and methods are developed. Case in point, this great article by Sheryl Canter, Chemistry Of Cast Ironed Seasoning: A Science-Based-How-To

This was originally shared by Wisconsin Limey in This Forum Thread

How To Make Bechamel And Its Derivatives

Sauce Bechamel is a milk based French Mother Sauce. It is used as a simple base to make popular secondary sauces such as Sauce Mornay, Cheddar Cheese Sauce, or even a simple cream sauce.

Standard Bechamel Recipe

  • 4 oz/125 grams white roux

  • 1 qt/1 L milk (Any milk will use but whole milk is preferred)

  • 1/4 white onion, skin peeled off

  • 1 whole clove

  • 1 whole bay leaf

  • Salt, White Pepper and Nutmeg To Taste


  1. Combine flour and butter in a small pan, and cook over moderate heat, to make a white roux.

  2. In a separate pot, heat up milk to a simmer.

  3. Add roux to the milk, making sure that both the milk and the roux are not too hot.

  4. Whisk the roux and milk together and bring to a simmer.

  5. Stick your bay leaf to your white onion with your whole clove, and place in simmering milk.

  6. Simmer for about 30 minutes, and thin with milk if necessary.

  7. Season with salt, white pepper and nutmeg to taste. The nutmeg should not be prevalent, but instead should add depth of flavor.

  8. Finish by straining through a chinois.

Bechamel Based Secondary Sauces

Almost any milk or cream based sauce that you will make, will be based on classical Bechamel. Below are some popular secondary sauces that are based on this recipe. Each recipe below is based on 1 qt/1 L of Bechamel, which is what the recipe above yields.

Standard Cream Sauce

  • Add 4-8 oz of heavy cream, heated or tempered

  • Season with salt, white pepper and lemon juice to taste

  • Add your favorite  herbs and spices to taste

  • Strain through a chinois to insure a smooth, creamy texture

Mornay Sauce

  • Stir in 4 oz of Gruyere and 2 oz of Parmesan cheese, both grated

  • Turn off heat and swirl in 2 oz of raw butter

  • Adjust consistency with warm milk as necessary

Cheddar Cheese Sauce

  • 8 oz cheddar cheese, grated

  • 1/2 teaspoon dry mustard

  • 2 tablespoons Worcestershire sauce

  • Stir all ingredients into warm Bechamel until cheddar cheese is melted

Simple Mustard Sauce

  • Stir in 4-6 oz of good dijon mustard

  • Finish off the flame by swirling in 2-4 oz of raw butter

  • Strain through a chinois

More Info

How To Poach

Poaching is a great way to cook delicate proteins such as fish. It is a moist method of cooking that gently and evenly cooks a protein without allowing the protein molecules to coagulate too quickly which can result in the finished product becoming chewy.

Basic Technique For Poaching

  • Heat poaching liquid (usually stock, wine, or court bouillon), to anywhere between 160-180 degrees Fahrenheit. A good visual guide is when bubbles start forming on the bottom of the pan but do not break the surface.
  • Some chefs will heat their poaching liquid to upwards of 200 degrees to counteract the cooling that will occur when the protein is placed in the liquid.
  • Monitor the temperature of your poaching liquid with a good thermometer to make sure that the temperature remains consistent.
  • Poach your protein to the desired finished temperature (about 130-135 degrees for fish and 135-140 for meat).
  • Remove protein and allow to rest for about 5-10 minutes depending on size and weight.

More Info

How To Cook A Prime Rib

The term “prime rib” is often incorrectly used for what is really a rib roast. The word prime is derived from the highest grading beef can obtain from the USDA, due to its marbling and fat content. Most true “prime ribs” are used by high end steak houses and swanky hotels, leaving only the choice USDA grades to be found at most supermarkets.

However, there is no law against a restaurant calling a roasted “choice grade” rib of beef “prime rib” because who’s to say that they didn’t roast it in a “prime” fashion.

So why call this post “How To Cook Prime Rib” even though its really a rib roast? Because that’s what people know it as and will keep calling it no matter how incorrect. But at least now you know the real truth. So without further delay…

How To Cook Prime Rib
 

  • When cooking prime rib, I like to always heavily salt the rib roast the day before and leave it in the fridge overnight. If you salt the rib roast right before cooking, it will draw moisture to the surface through osmosis and retard the browning process.
  • A lot of people like to start their “prime rib” in a 300-350 degree oven in order to keep it from shrinking. Me personally, I like to roast it first at 500 degrees for about 15 minutes to give the meat a little jump start on the browning process
  • Start by heavily seasoning your rib roast with lots of kosher salt and pepper and letting it sit in your fridge overnight if at all possible.
  • Place the rib roast fat side up in a roasting rack, and place the roasting rack in a roasting pan. If the fat cap is thicker than 1/2″, trim it down accordingly.
  • Insert a probe thermometer into the center of the rib roast, (this step can be omitted if you are using an instant read thermometer).
  • Place the rib roast (aka prime rib) into a 500 degree oven for about 15 minutes to help the browning process begin.
  • After 15 minutes, lower the oven to 300 degrees and allow to cook until it reaches the desired internal temperature, (120 degrees F for rare, 130 Degrees F for medium) allowing for about 10 degrees of carryover cooking. This means that for medium, you should really pull the rib roast out of the oven when your thermometer reads 120-125 degrees Fahrenheit. Note: end pieces will be more done than the center.
  • After the desired internal temperature is reached, remove from the roasting rack and allow to “rest” in a warm place for about 15-30 minutes. This will cause the juices to evenly distribute back into the meat, keeping your prime rib moist when slicing.

While your prime rib is resting, it is the perfect time to make your pan jus from the drippings.

  • Put the roasting pan on the stove top on medium-high heat. If there is an excessive amount of fat in the drippings, you can pour some of it off, being careful not to lose any of the meat juices.
  • Throw in some mirepoix (diced onions, celery and carrots at 2:1:1 ratio respectively) and brown in the fat drippings.
  • Once the mirepoix is nice and browned, add in some roasted veal stock at the rate of 1/2 gallon per 10 lb prime rib. Allow to simmer and reduce by at least 1/2, making sure to scrape all of the little brown meat drippings off the bottom of the pan.
  • Strain through a chinois into a sauce pot, and allow to sit off the flame so that the fat has a chance to rise to the top. Skim off the fat, and finish your jus by seasoning with salt and pepper to taste.
  • Serve your prime rib with some sort of potato (baked, mashed, fried, etc), a good seasonal veg, some horseradish sour cream, and of course your natural pan jus.

How To Roast

To roast something is to surround it with hot, dry air. It is a great technique to cook any number of items including fish, poultry, meat and even vegetables.

Roasting and baking are basically the same thing, except roasting is usually used when referring to meat, poultry and vegetables, while baking is usually used to refer to fish, breads and pastries. This is nothing more then culinary semantics, and both techniques are really one in the same.

Proper Technique For Roasting

  • Never cover your product when roasting. Covering will create steam, and instead of roasting your meat or vegetables, you will instead be steaming.
  • When roasting meat or other forms of protein, try to always use a roasting rack. This will keep the product from simmering in its own juices, which will cause the underside to poach and not roast.
  • If using a conventional oven to roast, anticipate hot spots and uneven cooking. The product which you are roasting will cook faster on the back side then the side closer to the front of the oven since most of your heat is lost through the door. To avoid uneven cooking, be prepared to rotate your product, especially when roasting for extended periods of time.

How To Pick Out A Chef's Knife That's Right For You


Choosing the right chef's knife is one of the most important decisions you’ll make when equipping your kitchen. Your chef’s knife is the number one tool you’ll constantly and consistently use. My advise is not to skimp and try and get off cheap.

You really don’t need any number of those crazy tools and gadgets that you see displayed at your local kitchen store. Avocado slicers, tomato dicer; what’s this, a lettuce knife? Please!

I like having gizmo’s and gadgets just as much as the next guy, but when it comes down to it, you only need two knives: a 10” chef’s knife and a 6-7” utility knife.

Why Only Two Knives?

When I first enrolled in culinary school, I was ecstatic to find $2,500 of my $55,000 dollar tuition would be put towards an extensive tool kit, including about 15 different knives. A couple months later when I begged my way into one of the best fine dining restaurants in San Francisco as an apprentice, I realized I really only needed two knives; a 10” chef’s knife and a 6” utility knife.

The first day I showed up, I brought my entire knife roll with me into their extremely small kitchen. After all, I didn’t know any better, I was nothing more than some amateur who’d been watching Emeril bam all over the screen and make all sorts of money and I thought to myself, “I can do this.” So I ask the poor shlup who was assigned to baby-sit me where I could put my knives.

“You don’t. Put your knife roll upstairs with the lockers, and bring down your chef’s knife and your pairing knife,” he said with understandable annoyance.

This is how I found out the hard way, and with much embarrassment, you really only need two knives in your kitchen, a Chef’s knife (preferably 10”) and a pairing knife. As I progressed forward with my skills but still understood the importance of minimizing my knife selection, I traded in my pairing knife for a 6.5” Utility knife. Here’s why:

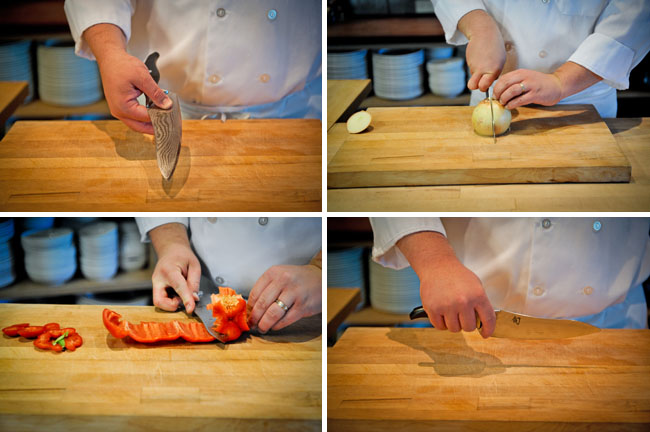
My 10” chef’s knife is my go to blade when I need to slice, dice, mince, julienne or batonnet, but it becomes a little arduous when fabricating meat or performing more delicate cuts. Although at first it may seem a little awkward using a utility knife in place of a pairing knife, with practice it can be done.

I also use my utility knife for all the major meat fabrication I do on a regular basis, including breaking down and de-boning chickens, fabricating beef tenderloins into filets, and cleaning and portioning fish. Quite honestly, with a little practice and proper technique, your chef’s knife and utility knife will be able to handle 95% or more of your average workload. But knowing the secret that you only really need two knives in your kitchen isn’t enough. To make this secret work, you need to know how to choose a knife that’s right for you.

What To Look For in A Knife

When I go out to buy a new knife, no matter if it’s a chef’s knife, utility knife, or just a knife for fun, these are the three main things that I take into consideration; steel, handle and weighting.

The Steel

The first thing you need to address is what kind of steel you want. This is commonly overlooked when buying a knife but it should play an important role in your decisions once you understand the two major differences.

Although there are many types of knives manufactured by different companies using numerous kinds of steel alloys, your decision will pretty much come down to two choices: German Steel or Japanese Steel.

German knives are characterized by traditionally having a little bit of a thicker blade as compared to Japanese knives. This makes them a little more sturdy and less prone to breaking off a tip when dropped (which can and will happen). German knives are also traditionally sharpened to about a 22° angle, making them sharp but also sturdy.
 

German Knife Pros:

  • Sturdy and strong.

  • Hold their edge for a good amount of time

  • Easy to sharpen

German Knife Cons:

  • Thicker blade makes delicate cuts more difficult, such as slicing sashimi for sushi, or the fine julienne and Brunoise of vegetables.

Japanese knives on the other hand have a more delicate composition with a thinner blade that is usually sharpened to an 18-16° angle. This extreme edge makes them impressively sharp, but they don’t stay sharp quite as long. They’re also a little bit more difficult to sharpen.

Japanese Pros:

  • Sharpened to an extreme angle which makes them razor sharp.

  • Great for more delicate cuts such as sushi and fine vegetable work.

Japanese Cons:
 

  • Tend to be a little more difficult to sharpen than German knives.

  • Because they are sharpened to such an extreme angle, their edge is a little more fragile and won’t hold for quite as long. (There are some exceptions to this rule).

The Handle

When choosing a knife, you want to take into careful consideration the type of handle the knife has. It should comfortably fit the type and size of your hand. If you have a smaller hand, you’re going to want to buy a knife with a thinner handle. Conversely, if you have a larger hand, you'll need to purchase a knife with a wider handle. Someone with a larger hand who uses a thin handled knife will develop pressure points in the palm of their hand. This will tense their grip, leading to poor fluidity of movement and inaccurate cuts.

The key to having good knife skills is a knife you can hold with a relaxed and comfortable grip for an extended period of time.

Weighting

Finally, the third and final aspect you need to take into consideration when purchasing a knife is the overall weighting. But remember, don’t confuse weighting with weight. Too often I hear people bragging about how nice and light their chef’s knife is. “Hey, check this knife out, it’s light as a feather!”

Who cares? It’s not like your curling a 50-pound dumb bell every time you pick up a chef’s knife! What really matters is how the weight is distributed throughout the knife, or the "balance."

For longer knives, such as the 10” chef’s knife or a long slicer, the balance point should be right where the blade connects to the handle, meaning the blade and the handle are of about equal weight. The shorter the blade gets (such as a three inch pairing knife), the more handle heavy the knife will be. This will give you greater control over the confined and intricate movements you will inherently be making with a shorter blade.

Chef Knives I Recommend

Further Information
 

Stella Culinary's Guide To Stock

What Is Stock?

A stock is a liquid made by slowly simmering ingredients in water to extract their flavor. The French word for stock is “fond,” meaning foundation, a true testament to just how important these flavored-liquids are to the cooking process. A great stock is one of the most important assets chefs and amateur cooks have at their disposals.

Ingredients Needed For Making Stock

There are four basic components to any great stock:

Bones – The key element (unless it is vegetarian), bones with a high collegian content (such as veal knuckle bones or chicken necks and wings) are best for making a traditional stock.

Mirepoix – Mirepoix, a mixture of onions, celery and carrots, is added to the stock for it’s aromatic qualities and to deepen the flavor of the stock. The basic ratio for classical mirepoix is:

  • 2 Parts Onion

  • 1 Part Celery

  • 1 Part Carrot

  • Note: For every five pounds of bones, you will need 1 pound of mirepoix.

Water – Seems pretty self-explanatory, but there are some things to consider. The water in which you simmer the rest of your ingredients will make up a large percentage of your stock. If you live in an area with hard water, or just poor water quality in general, I would recommend using bottled water. You don’t have to go crazy, the filtered water that is dispensed into plastic jugs at your local supermarket will work just fine.

Sachet – There are no hard and fast rules to creating sachets. A sachet basically refers to aromatic herbs and spices that are tied up in a cheesecloth pouch and simmered with soups, sauces, or stocks to add extra flavor. A basic sachet for a stock will usually include:

  • Bay Leaf

  • Sprigs of Fresh Thyme

  • Whole Black Peppercorns

  • Whole Cloves

  • Parsley Stems

  • Note: The amount of each ingredient you add to your stock is based on personal preference and how much stock you will be making.

Basic Recipe for Protein- Based Stocks

  • 5 pounds bones

  • 1 pound Mirepoix

  • 8 ounces tomato paste (If making veal stock)

  • Sachet: 5-10 Peppercorns, 5 sprigs thyme, 5 parsley stems, ½ bay leaf, 2 whole cloves

  • Water to cover

More Information

How To Cook Mashed Potatoes

Mashed potatoes are something that we all know and love. They make a great side dish to accompany your favorite meat entrée, and are so versatile that you can serve them with almost anything. Although most people understand the underlying principles of how to make mashed potatoes, there are some techniques and secrets that restaurant chefs employ to ensure that their mashed potatoes are better than the ones you make on “turkey day”.
 

Mashed Potato Procedure
 

  • Peel whole russet potatoes and cut into manageable chunks. I’ll usually cut my potatoes into quarters lengthwise, and then cross cut them into pieces roughly measuring about 2.5 inches.

  • Place your potato chunks in an appropriately sized pot, add a couple large pinches of salt and cover with cold water. Starting your potatoes in cold water will allow the complex starches to cook more evenly.

  • Place the pot on your stove top, turn to high heat, and bring to a boil.

  • Once the water begins to boil, reduce to a simmer and cook until fork- tender.

  • When the potatoes are fork-tender, strain them off and make sure that all the water is allowed to drain out.

  • From this point, most home cooks would simply mash with a hand masher, add butter, salt, pepper, and possibly a touch of cream. There is absolutely nothing wrong with this method, but if you want your mashed potatoes to truly be the best that your dinner guests have ever put into their mouths, then keep reading.

Secrets to Making Great Mashed Potatoes
 

So what are the secrets that restaurant chefs use to make great mashed potatoes? Here they are, in no particular order:
 

  • Use a food mill. Passing your mashed potatoes through a food mill will give them a wonderful silky smooth texture. Do this first, before you add your butter and cream. If you like your mashed potatoes chunky - fine, then don’t mill them. However, silky mashed potatoes are much harder to come by in the home, and honestly, they just taste better.

  • Add enough butter to give your cardiologist a heart attack. The number one reason why mashed potatoes made by a restaurant chef will always taste better than yours is because they mix in an enormous amount of butter. A good place to start is about 1-2 ounces of butter for every large russet potato used.

  • Use European-style butter. Most fine dining chefs use European-style butter because it has a higher fat content. One brand that is commercially available to the home cook is Land O’ Lakes. It should say something like “European Butter” on the box. (If you haven’t figured it out yet, fat is KING.)

  • The creaminess from your mashed potatoes should come from the melted butter, not the cream. Add your butter first until the mashed potatoes reach their desired consistency, and then add a touch of cream for added body and texture.

  • Some chefs believe that melting the cream and butter together before adding them to the mashed potatoes allows the fat to coat the starch granules of the potatoes more evenly, giving it a better texture.

  • Season your potatoes well with plenty of kosher salt. The number one mistake that most home cooks always make is that they under season their food. If you made your mashed potatoes properly, they should contain an enormous amount of fat, which will coat the palate. To counteract this, a little extra salt is needed to really bring out the flavor.

What are some of your favorite things to add to mashed potatoes, and what secret tricks do you use to make them the best your dinner guests have ever tasted?

How To Cook Risotto

Risotto is made with Italian-grown Arborio rice. Arborio has rice kernels that are shorter and fatter than other short-grained rice. The kernels contain a high amount of starch, which is what gives risotto its creamy texture. A common misconception is that cream is added to risotto to give it its creamy texture. Classic risotto, in fact, does not contain any cream. Although adding cream is not the worst of culinary sins, it should be added for richness and flavor, not texture. More on this later...

Risotto Technique

  • Start by sweating shallots in a pan with butter and a little salt, until the shallots are soft and tender. For every 1lb of Arborio rice, you will need to use 2-4oz of butter and sweat about 5 shallots.

  • Add the Arborio rice to the pan, stirring with a wooden spoon until the rice kernels are evenly coated with the butter; Do not brown.

  • Note: You don’t have to use butter for your fat. Any fat will do such as pork, duck, or olive oil - butter is just the classical choice. Take into consideration the flavor profile the fat you choose will impart on the finished risotto. As far as most chefs are concerned, butter is KING!

  • Once the rice is sautéed and coated evenly, add hot stock or water that is simmering in a separate pot, one ladle at a time.

  • Note: For every cup of Arborio rice, you will need at least 3 cups of hot stock or other liquid

  • Very gently simmer rice while constantly stirring.

  • Once the rice absorbs the first ladle of liquid, add more, one ladle at a time, stirring constantly. Repeat until the Arborio rice is soft but still “al dente”, and the starches have released from the kernel making the risotto nice and creamy.

  • Finish by stirring in butter and freshly grated parmesan.

If at all possible, use the correct corresponding stock of the protein you will be serving with the risotto. For example, if you will be serving it with fish, use a fish stock; if you will be serving your risotto with beef, use veal stock, etc. If the risotto is served as the entrée itself, use whatever liquid you feel is appropriate for your desired finished dish.

To Cream or Not To Cream

The debate among chefs on whether or not to finish their risotto with cream is a passionate one. Traditionally speaking, risotto is not finished with cream; instead, the creaminess is lovingly coaxed out of the starchy kernels of the Arborio rice. Here are some things you need to consider when making the decision “To Cream or Not To Cream.”

  • If you add cream for a creamy texture, I apologize, but you are sorely misguided. The creamy texture of your risotto should come from the Arborio rice itself. Remember, you are making risotto, not rice with alfredo sauce.

  • If you add cream for extra body and fat content (fat is always welcomed by the human palate), then you are adding it for the right reason.

  • Take into consideration that when you add fat to anything, it coats the palate, muting other flavors. The more subtle flavors of your risotto will be less detectable, so consider adding more salt or any other predominant seasoning or flavor you want to manifest in your risotto.

  • If you are serving the risotto with a more delicate protein, such as fish or poached poultry, I would leave the cream out. It may make the risotto too heavy, and as good as the risotto is by itself, your starch should never overpower your protein, it should always add to it.

  • When adding cream to a risotto, some chefs will whip it into a stiff whipped cream and then fold it in. This will not only give the risotto a rich flavor, but also a light and creamy texture.

Restaurant Risotto

Great risotto is a labor of love that can’t be rushed or faked. I’ve seen many different recipes for “quick and easy” risottos, some that even use a microwave (gasp!). Such culinary sins shall not be condoned on this site. However, did you think that the amazing black truffle risotto with wild forged mushrooms you had at Restaurant Fancy Pants the other night was made to order? Not likely.

 
With a cooking time of at least 25 minutes or more, restaurant chefs would never be able to make risotto “to order”. What follows is a basic restaurant technique for “pre-shifting” risotto. This will allow you to cook it ahead of time, and finish it “to order”.
 

  • Begin by starting your risotto with the basic technique stated at the top of this article.

  • Cook the Arborio rice until it starts to soften, but stop just before it becomes truly “al dente”.

  • Pour risotto out onto a buttered baking sheet and spread into a thin and even layer.

  • Cool in your refrigerator.

  • When you’re ready to finish your risotto, say, after your dinner guests have arrived and consumed a couple glasses of good wine, bring your cooking liquid of choice (stock, water, etc.) to a simmer in an appropriately sized sauté pan.

  • Add the par-cooked risotto into the simmering liquid, and use the back of a slotted spoon to break up the individual rice kernels by pressing them down into the pan.

  • Gently simmer and stir until the risotto is reconstituted and becomes “al dente”.

  • Finish with butter, fold in whipped cream (if you dare), season to taste, and add any other flavorings you wish, such as parmesan, truffle oil, etc.

  • Watch your friends marvel at how quickly you were able to make an amazing tasting risotto.

Pages